 RemidiBox
How to use RemidiBox
A picture of every screen, with what each button does. Follow it in order, or jump to the part you need. Steps marked Pro are extras that are not in the free version.
The pictures are from a test phone with made-up data.
Make it yoursArrange your bottom barKeep the screens you use most one tap away: pick a layout, add Family or Workouts, and make the buttons bigger.See how →1. Before you start
RemidiBox is open for early access on Android. You need an invitation first.
- Ask for early access. Go to remidibox.com/early-access and enter the Google account email you use in the Play Store on your phone.
- Wait for our email. It has a link to join the test. Open the link on your Android phone and tap Install in Google Play.
- Open RemidiBox and sign in or create an account (next section).
Good to know: your medicines, schedules and history stay on your phone. They work with no internet.
Free and Pro
Everything in this guide works in the free version unless it is marked Pro. Pro adds extras in the same place you would use them.
Free for good: reminders, alarms, Taken and Skip, visit reminders, back up to a file, allergies and the emergency card, and the security features.
Pro adds: your own bottom bar and bigger buttons, the week strip through your whole course, full History with a calendar, test-value trends, more people, height and weight over time, growth charts and measuring reminders for children, physiotherapy courses, workout lists and plans, and more colours.
The Pro label in the app always shows the current list, so it is the quickest way to see what a screen offers.
Pro is coming soon. Until then, everything free works with no limits and the app shows no Pro labels. Use the buttons at the top to show everything, only the free steps, or only the Pro steps.
2. Create an account or sign in
You need a free account to use the app.
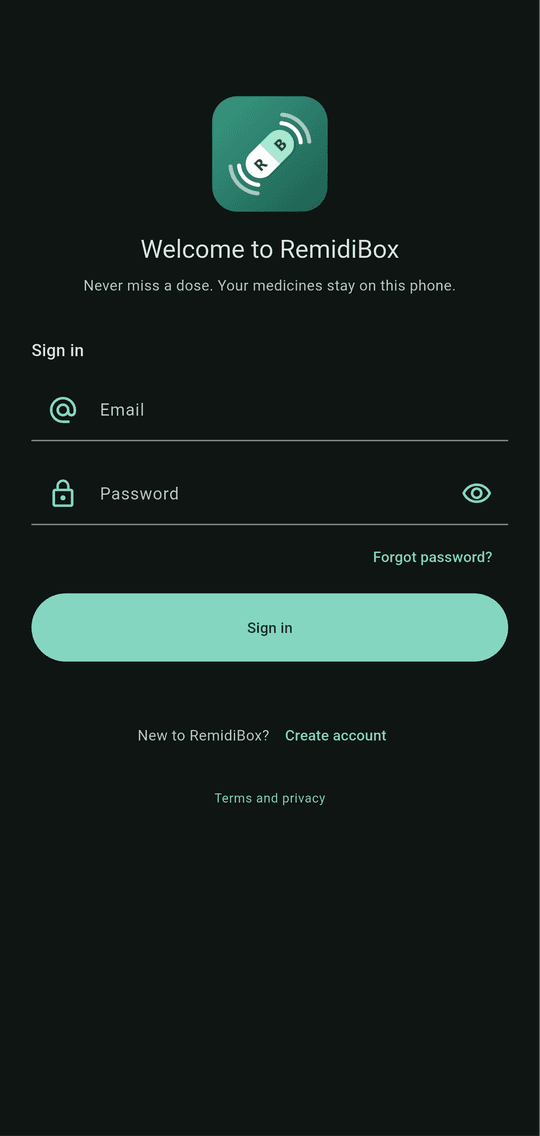
Sign in
The first screen asks for your email and password.
- Email and password: type the ones you used when you created your account. The eye icon shows or hides the password.
- Forgot password? we email you a code so you can set a new password.
- Sign in: opens the app. Next time the app opens by itself, even with no internet.
- Create account: for new users (see the next picture).
- Terms and privacy: opens the full text.
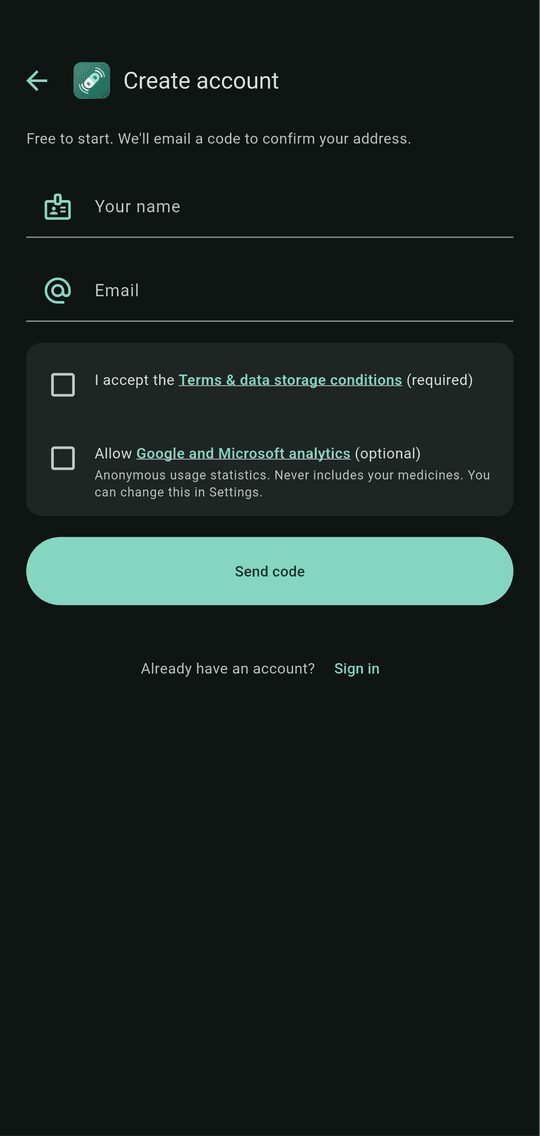
Create an account
Three short steps: details, a code from your email, then a password.
- Your name is needed: it appears on Today, next to the greeting. Email is the address you will sign in with.
- Terms & privacy: tick it to continue (it is required). Tap the blue words to read them. It includes analytics that help us improve the app, which you can turn off in Settings.
- Help improve RemidiBox: in the EU, the UK and Switzerland this is a box of its own; tick it to share usage statistics and crash reports.
- Send code: we email you a short code to prove the address is yours. Type it in, then choose a password.
- Already have an account? Sign in takes you back.
Tip: If the code does not arrive, check your spam folder.
3. The Today screen
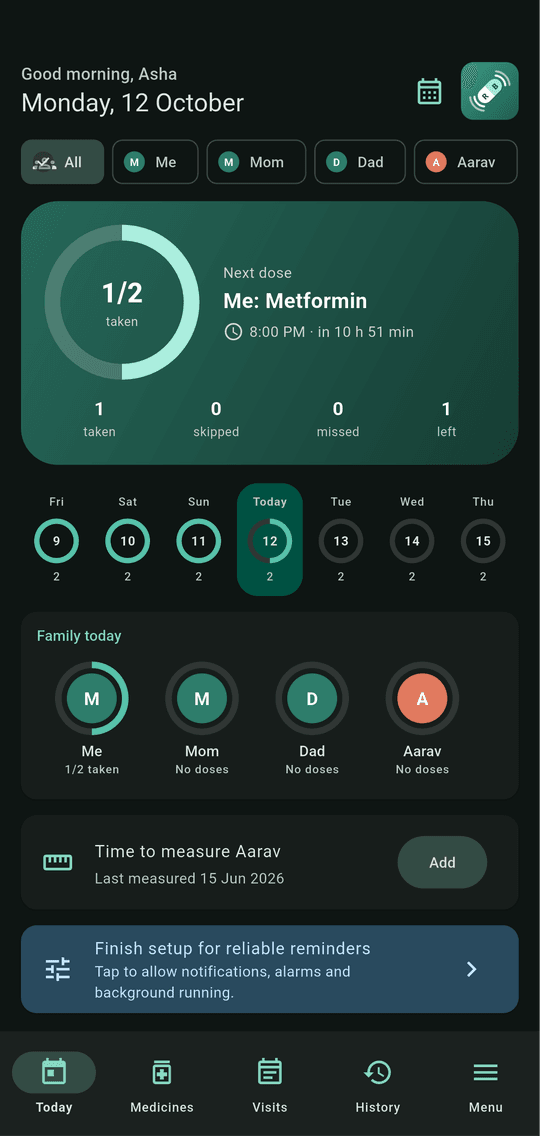
This is the first screen after you sign in. It shows what you need to take today.
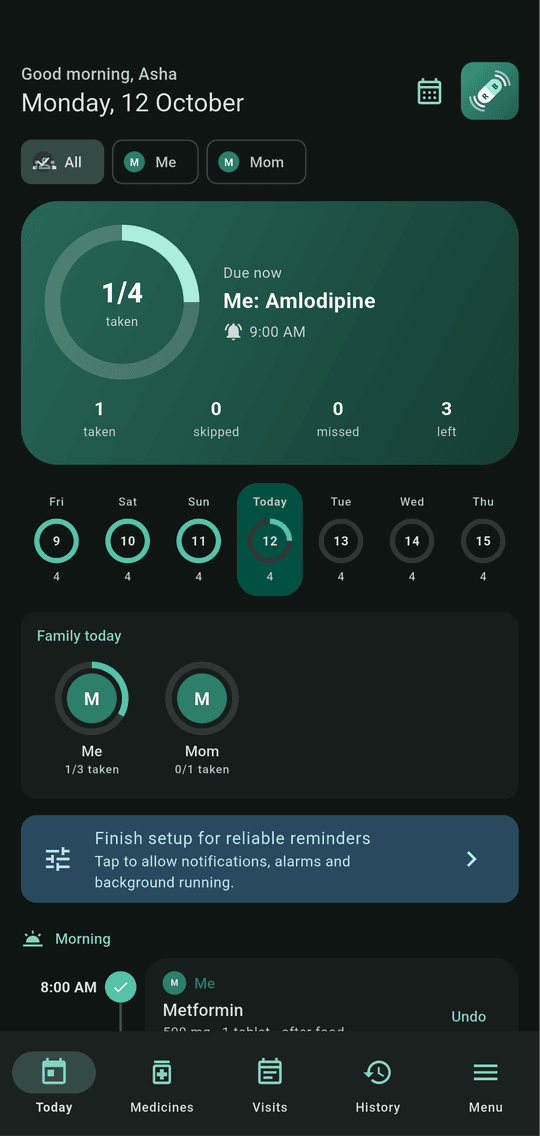
What is on Today
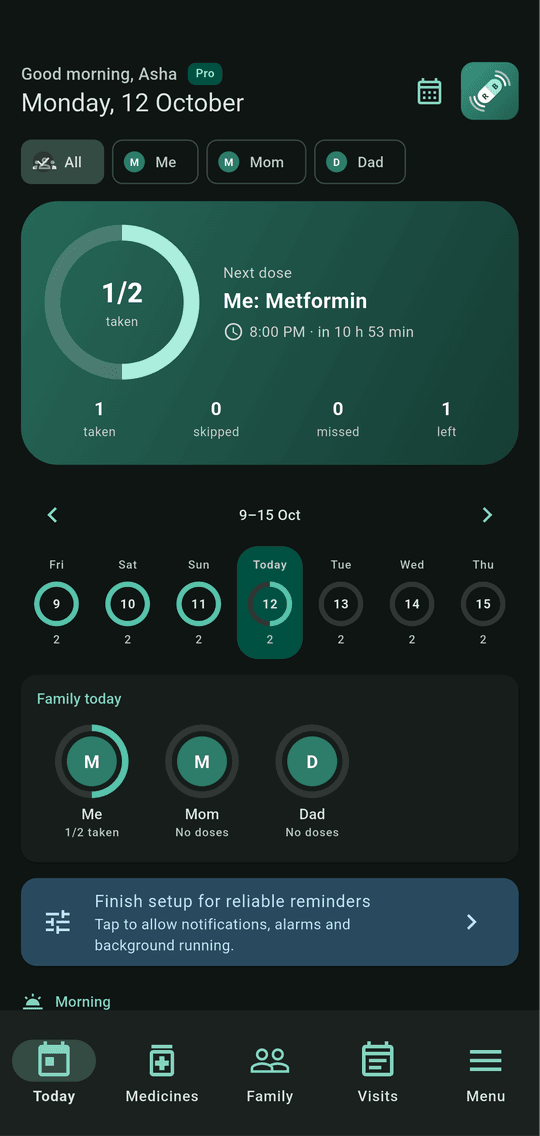
- Greeting, your name and the date at the top. Pro accounts also show a Pro label beside the name. If your account has no name yet, a card asks for it once. The calendar icon on the right lets you go to any date.
- All, Me and the names filter the screen by person. Tap a name to see only their medicines.
- The big card shows how many doses you have taken today and which dose is due now.
- The week strip shows the days around today. Tap a day to see its doses. A full ring means all taken.
- Family today shows each person's progress.
- Visits and workouts planned for the day are listed under the doses. Tap Log it on a workout once it is done, or Skip.
- The setup banner appears when Android still needs your permission for reminders. Tap it to finish setup (see Make sure every reminder rings).
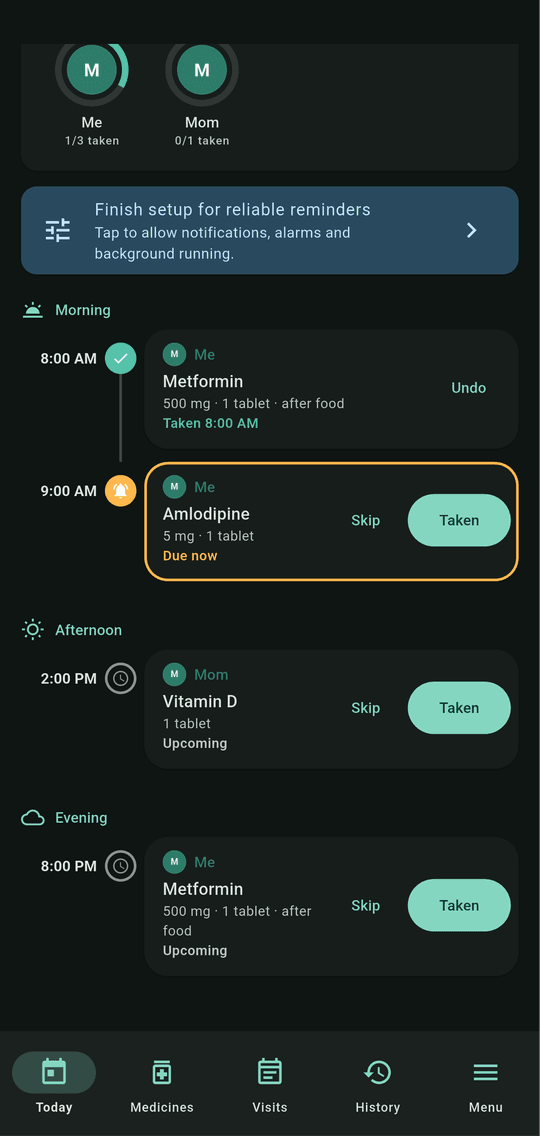
Taking a dose
Scroll down to see every dose for the day, grouped as Morning, Afternoon and Evening. A glowing outline means the dose is due now.
- Taken (green button): tap it when you have taken the medicine.
- Skip: tap it if you chose not to take this dose. It is recorded as skipped.
- The icon by the time: a green tick is taken, an orange bell is due now, a clock is still to come.
Tip: You can also answer from the reminder itself, without opening the app.
After you tap Taken
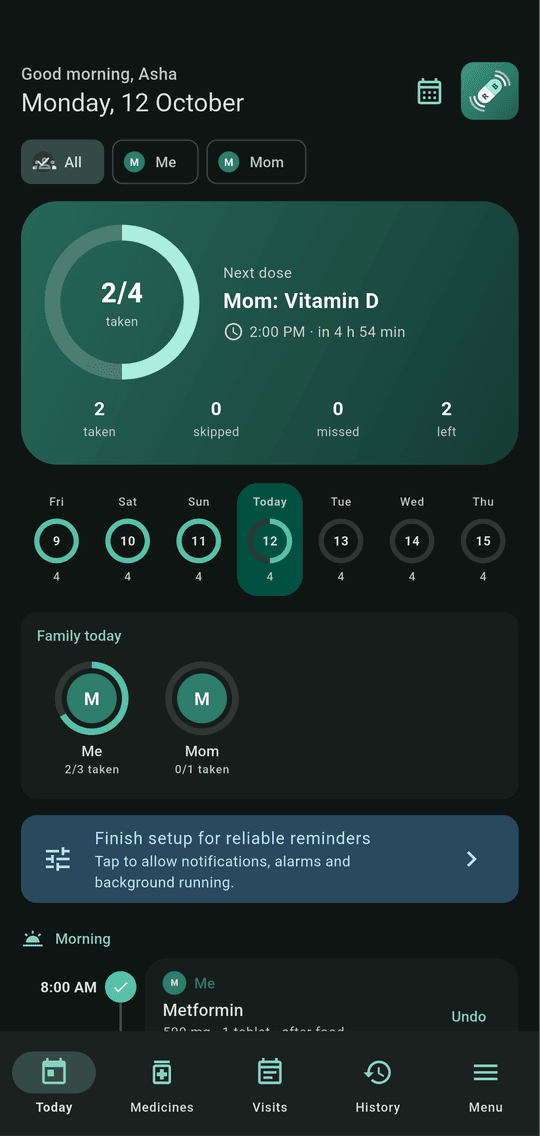
The dose turns into a green tick and the top card updates (here 2/4 taken). The next dose is shown as Next dose. The list stays where you were, so you can carry on down it.
- Undo appears next to a taken dose. Tap it if you pressed Taken by mistake.
- A dose nobody answers is kept in History as Missed.
Open any date Pro
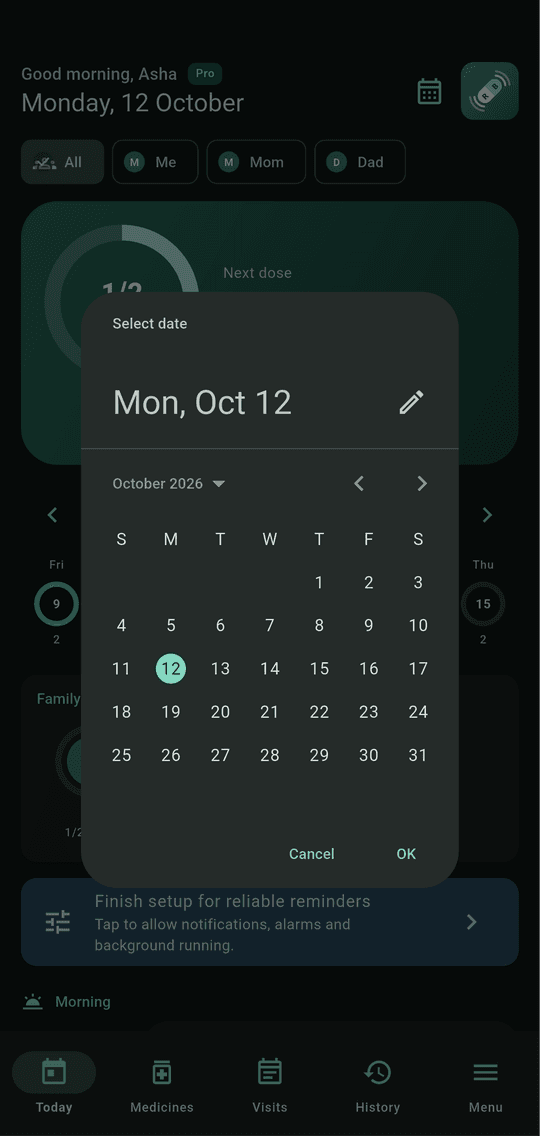
Tap the calendar icon at the top of Today to jump to a day.
- Pro: pick any date, years back or a year ahead, and see what was taken or is planned that day.
- Select date, then OK opens that day. Tap the week strip or the date again to come back to today.
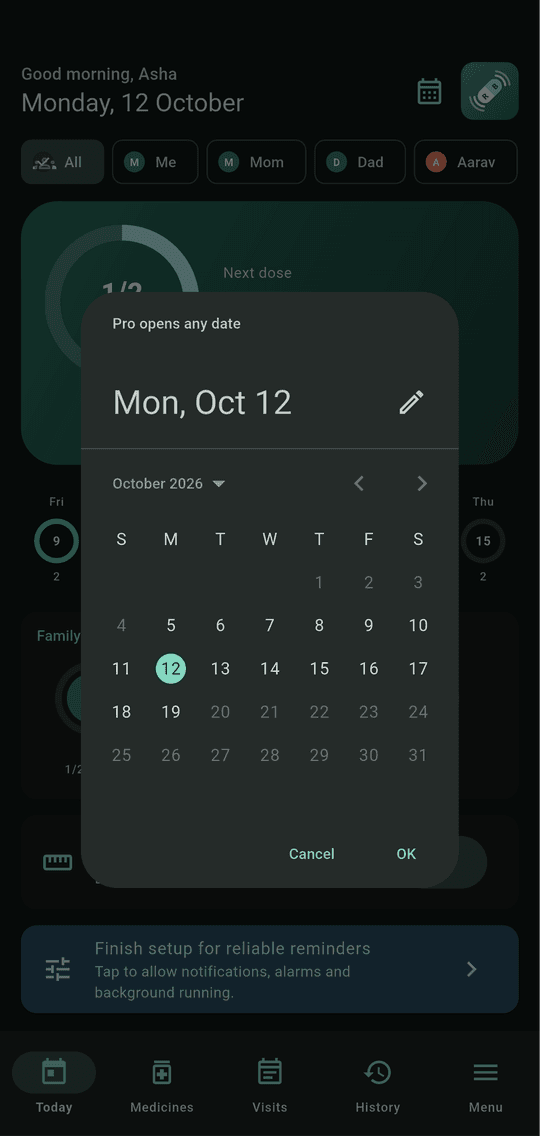
What Free sees: the week strip covers a week either side of today, and the calendar icon shows what Pro adds.
Browse your schedule Pro
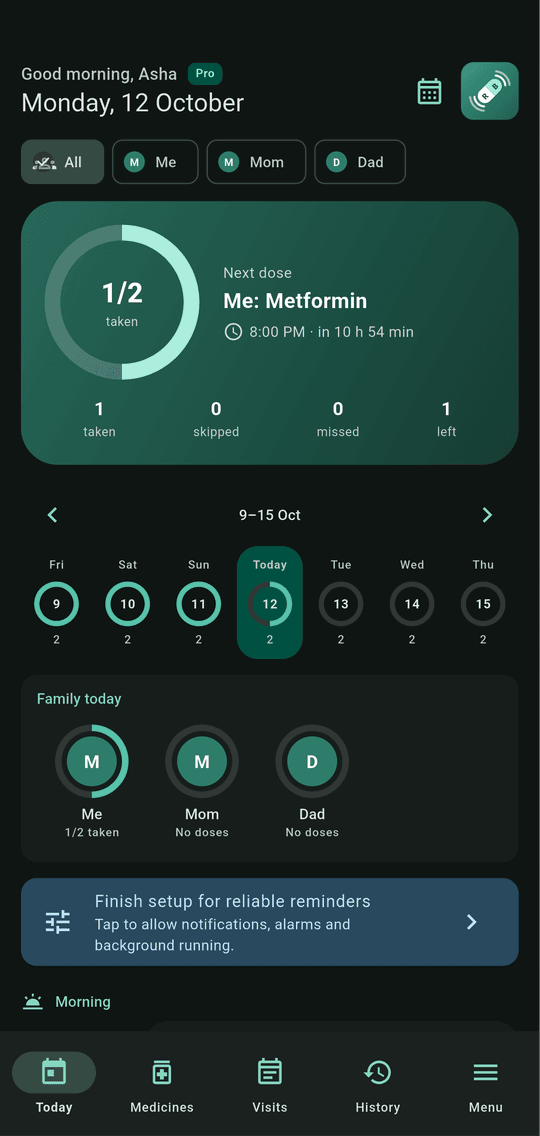
Under the big card, the week strip can move through every day of your courses.
- Swipe left or right on the week, or tap the arrows above it, to move a week at a time. The dates on show (for example 5–11 Oct) sit between the arrows.
- It goes as far as your schedule does. With a one-month course you can go forward to its last day and back to where you started. A course of a week or less keeps the strip as it is.
- The day you picked moves along with you, so the big card always shows a day on the strip. When you are looking at another day, Back to today on the big card brings you back to the current week.
- Tap a day to see its doses. The calendar icon still opens any date.
What Free sees: the usual week around today, without the arrows.
4. Your bottom bar
The bar at the bottom shows the screens you use most. With Pro, you choose what is on it.
Open the Bottom bar page Pro
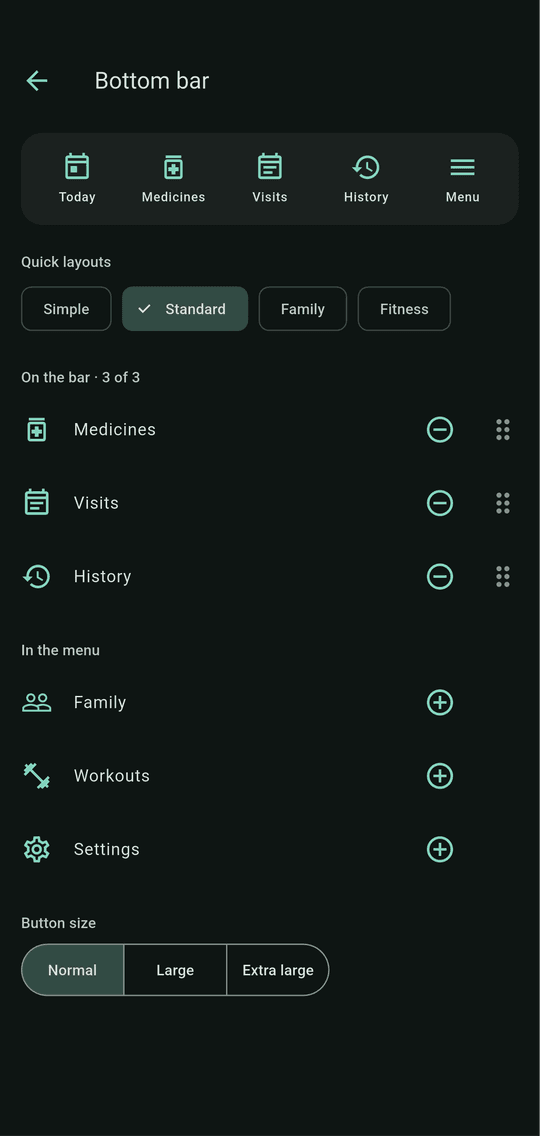
Go to Menu → Settings → Appearance → Bottom bar. The bar is shown at the top exactly as it will look.
- Today is always the first button and Menu the last. The places between are yours.
- Quick layouts set the whole bar in one tap.
- On the bar and In the menu list your screens. Move any of them between the two.
- Button size makes the buttons easier to see and tap.
Tip: Everything you take off the bar stays one tap away in the Menu.
Pick a quick layout Pro
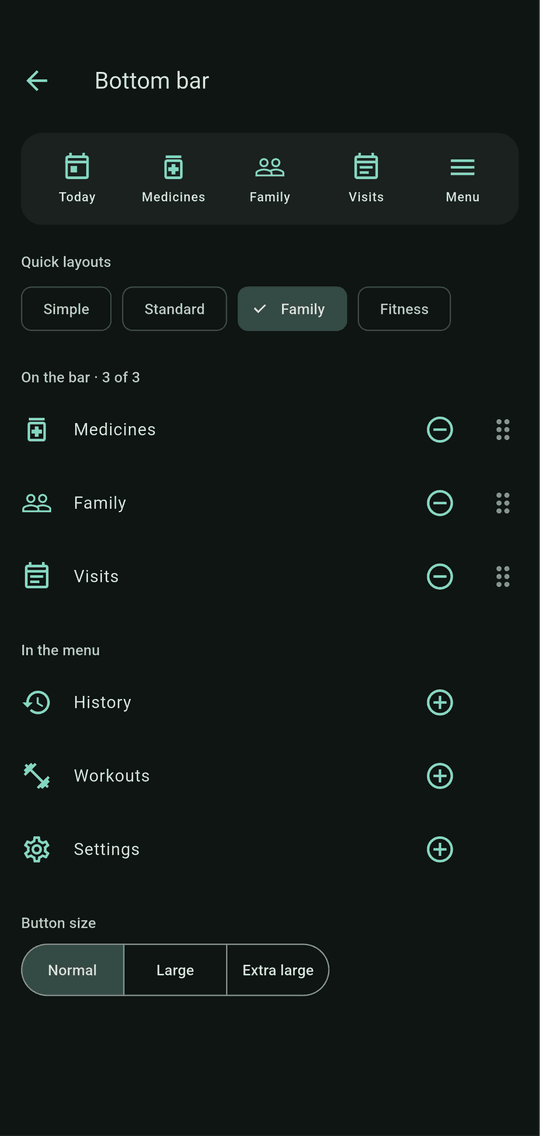
Tap a layout and the preview changes at once.
- Simple: Medicines, for the cleanest bar.
- Standard: Medicines, Visits and History.
- Family: Medicines, Family and Visits, to switch between people quickly.
- Fitness: Workouts and History, if you mostly log exercise.
- Arrange it yourself: tap − to move a screen to the menu, + to put one on the bar, and drag the handle on the right to change the order. The bar has five places in all (four at Extra large).
Tip: Try a layout and change your mind: nothing is lost, and you can switch back at any time.
Make the buttons bigger Pro
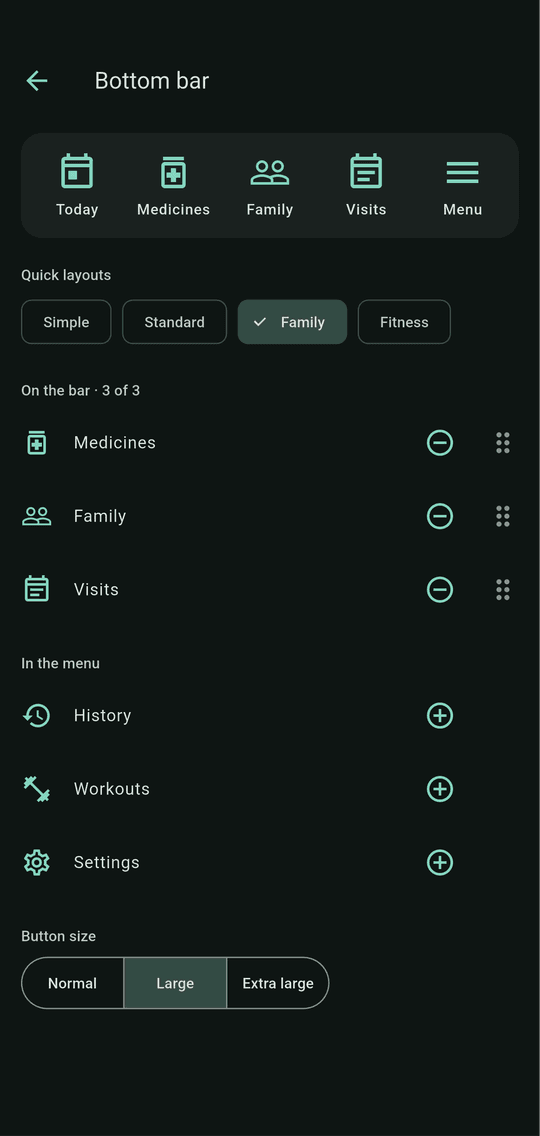
Under Button size choose Normal, Large or Extra large. The preview grows with it.
- Large and Extra large make the icons and names bigger on the whole bar.
- Extra large fits four buttons. If the bar has more, the app asks you to move one to the menu first.
Your bar at work Pro
Back on Today, the bar shows your choice.
- The screens on the bar open with one tap.
- Everything else is in the Menu, the last button, with Settings, Backup, your account, this guide and Feedback.
5. Add a medicine
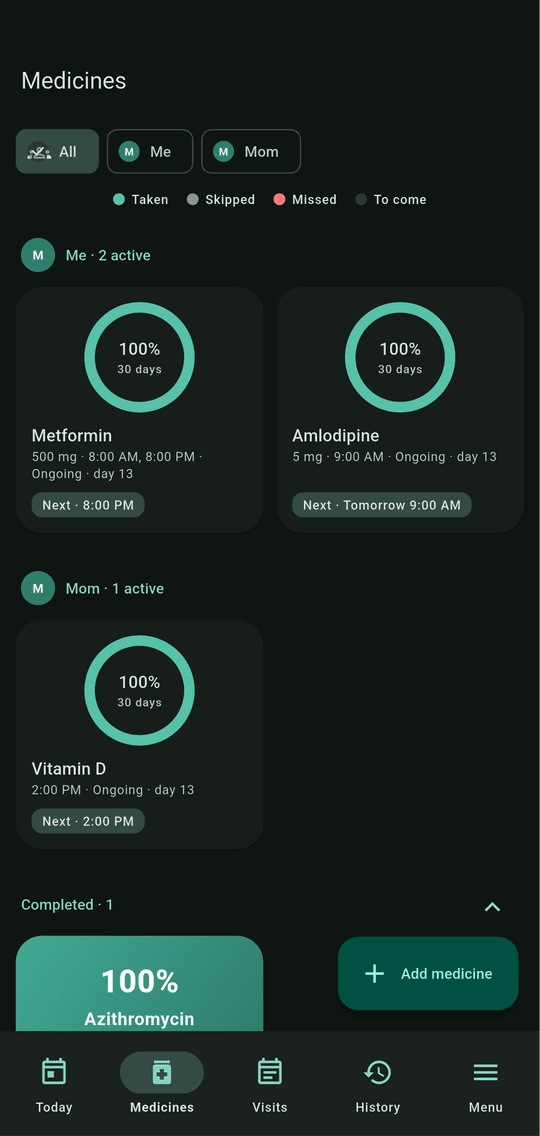
Open the Medicines tab at the bottom, then tap Add medicine.
The Medicines tab
Every medicine has a card with a ring that shows how well you took it over the last 30 days.
- Me, Mom… groups show whose medicine it is.
- The ring and the percentage show how many doses you took.
- Next says when the next dose is.
- Completed (at the bottom) holds finished courses.
- Add medicine (green button) opens the form.
Name and how often
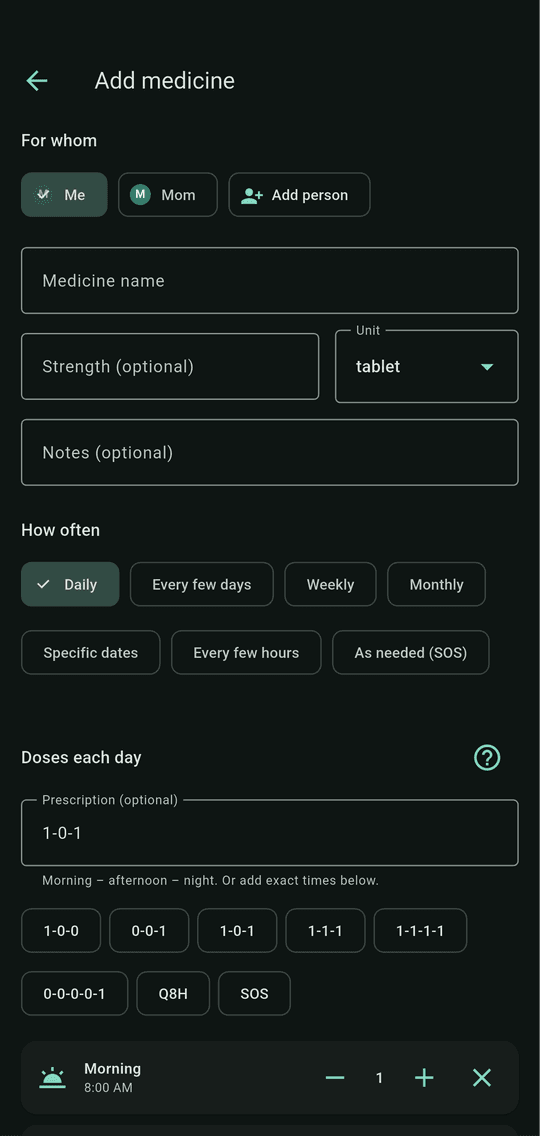
The form starts at the top. Only the name is needed.
- For whom: choose Me, a family member, or Add person.
- Medicine name (needed), Strength (for example 650 mg) and Unit (tablet, ml…).
- How often: Daily, Every few days, Weekly, Monthly, Specific dates, Every few hours, or As needed (SOS).
- Doses each day: pick a pattern from the prescription (see next picture).
Type the prescription
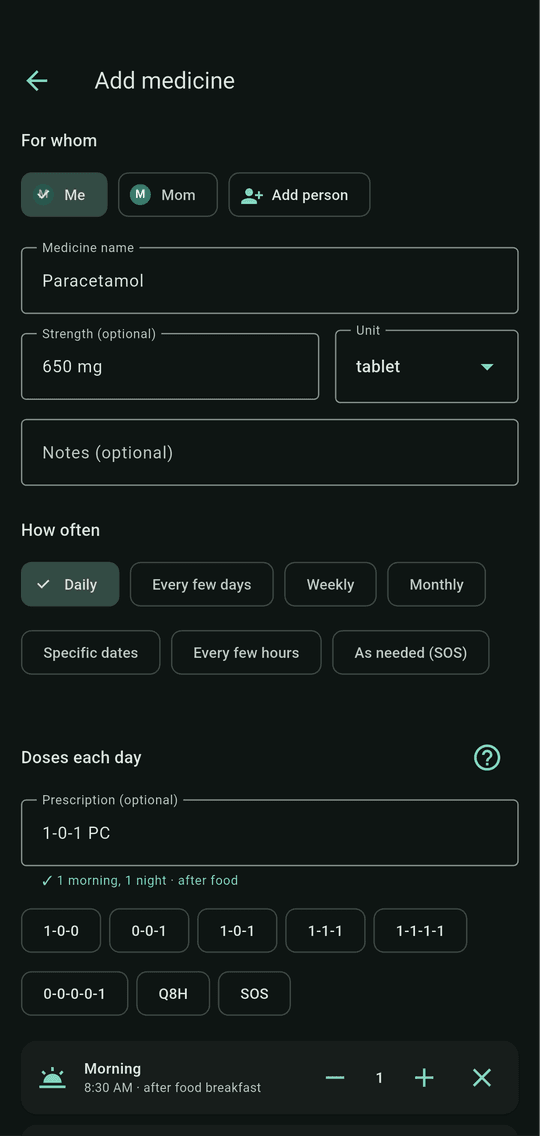
Copy what the doctor wrote. The app turns it into times.
- Prescription box: try 1-0-1 (morning and night), BD (twice a day) or Q8H (every 8 hours). Add PC for after food.
- The quick buttons under it (1-0-0, 0-0-1, 1-0-1…) fill the box for you.
- The line under the box shows how the app understood it, for example 1 morning, 1 night · after food.
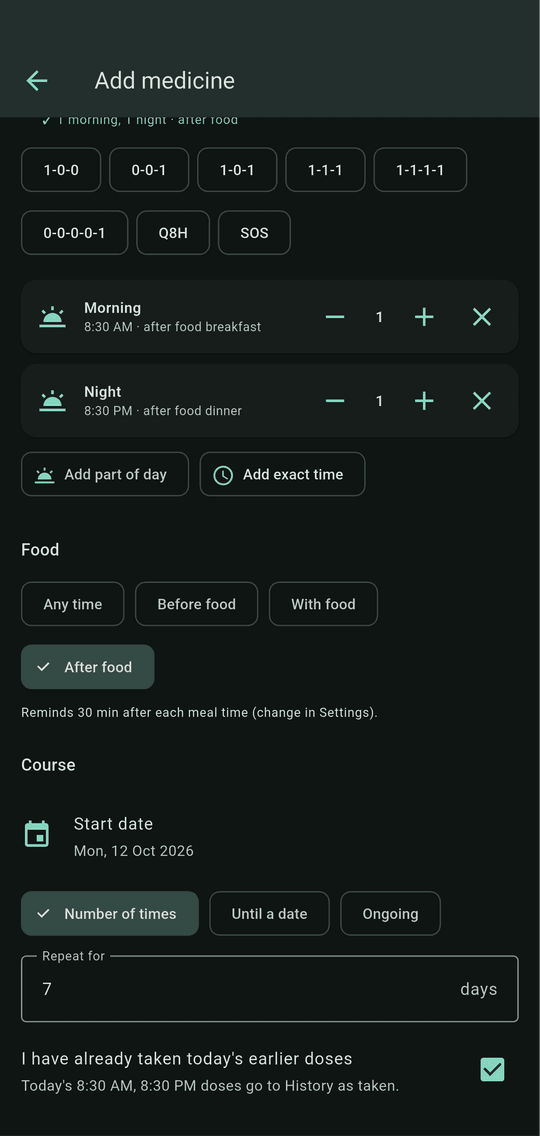
Times, food and course
Scroll down to check the times and say how long you need the medicine.
- Morning / Night rows: the time and the number of tablets. Use − and + to change the amount and × to remove a time.
- Add part of day / Add exact time adds another dose.
- Food: Any time, Before food, With food or After food. The reminder comes a little before or after your meal time.
- Course: start date, then Number of times (for example 7 days), Until a date or Ongoing.
- I have already taken today's earlier doses: tick this if you started earlier today, so those doses are not shown as missed.
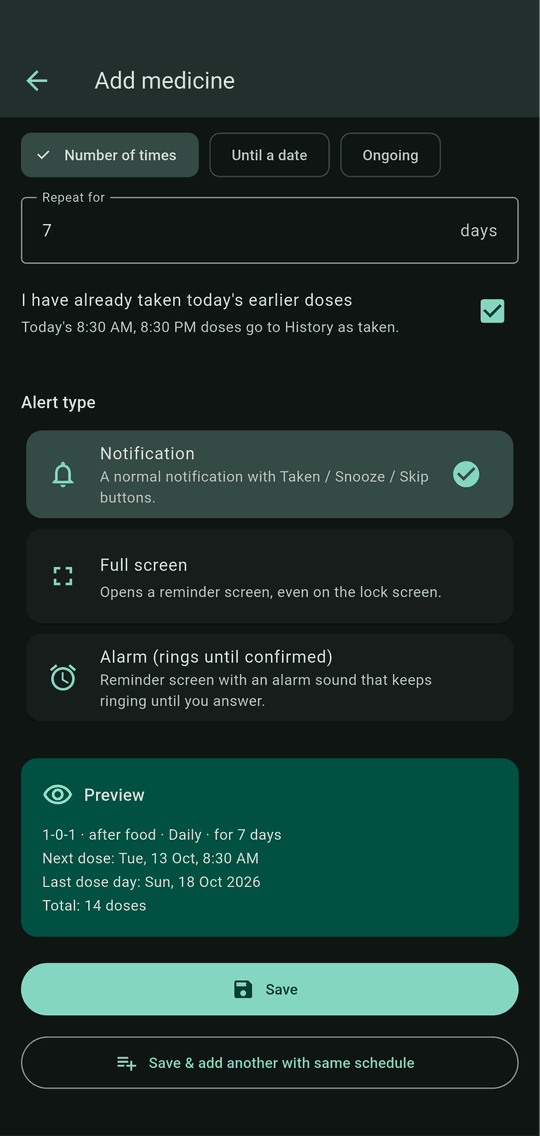
How should it remind you?
Choose one for each medicine.
- Notification: a normal notification with Taken, Snooze and Skip buttons.
- Full screen: a reminder screen that opens even on the lock screen.
- Alarm (rings until confirmed): an alarm sound that keeps ringing until you answer. New medicines start with this one.
- Preview (green box) lists the schedule and the total number of doses before you save.
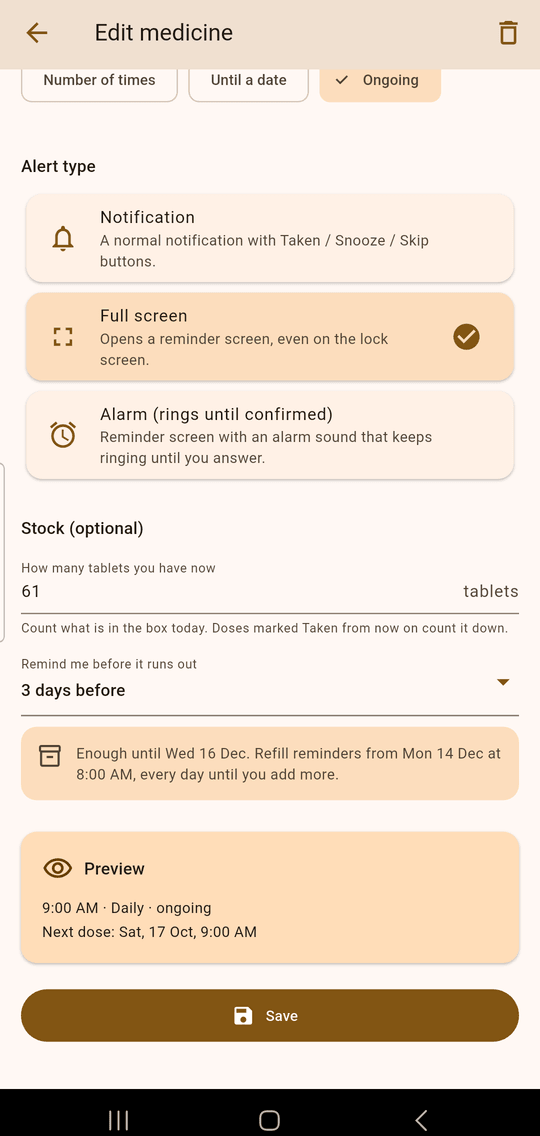
Stock and refills (optional)
Enter how many you have now, and RemidiBox reminds you to buy more before they run out.
- How many you have now: count what is in the box today. Each dose you mark Taken from now on counts it down; earlier doses don't.
- Remind me before it runs out: 3 days before, or choose from 1 to 14. The reminder comes each morning at your morning meal time, and Today shows a card.
- The note below says how long the stock lasts, or that it covers the whole course.
- Bought more? Tap Refilled on the Today card or on the medicine's page and enter how many you got. The reminders stop by themselves.
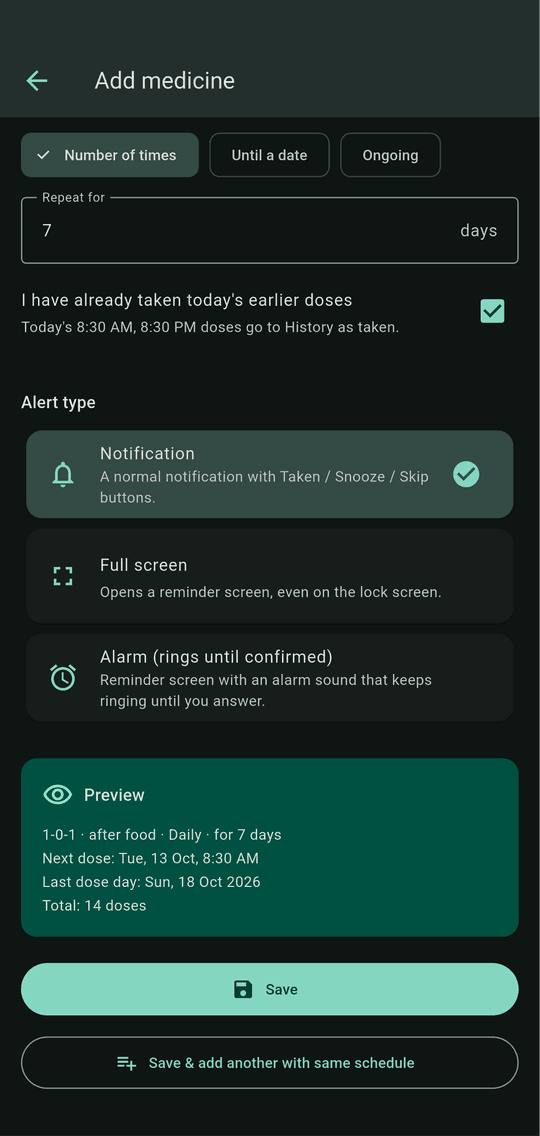
Save
Press Save when it looks right.
- Save: adds the medicine and sets all its reminders.
- Save & add another with same schedule: saves and starts a new form with the same times, handy for several tablets taken together.
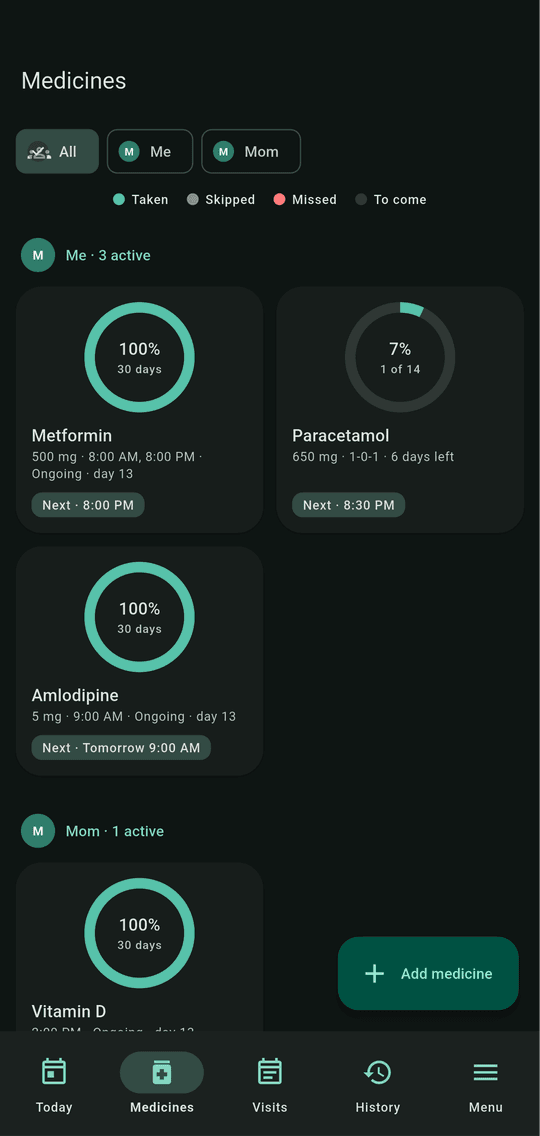
It is saved
The new medicine appears on the Medicines tab and its doses appear on Today.
Tip: Tap a medicine to see its details, pause it, edit it or delete it.
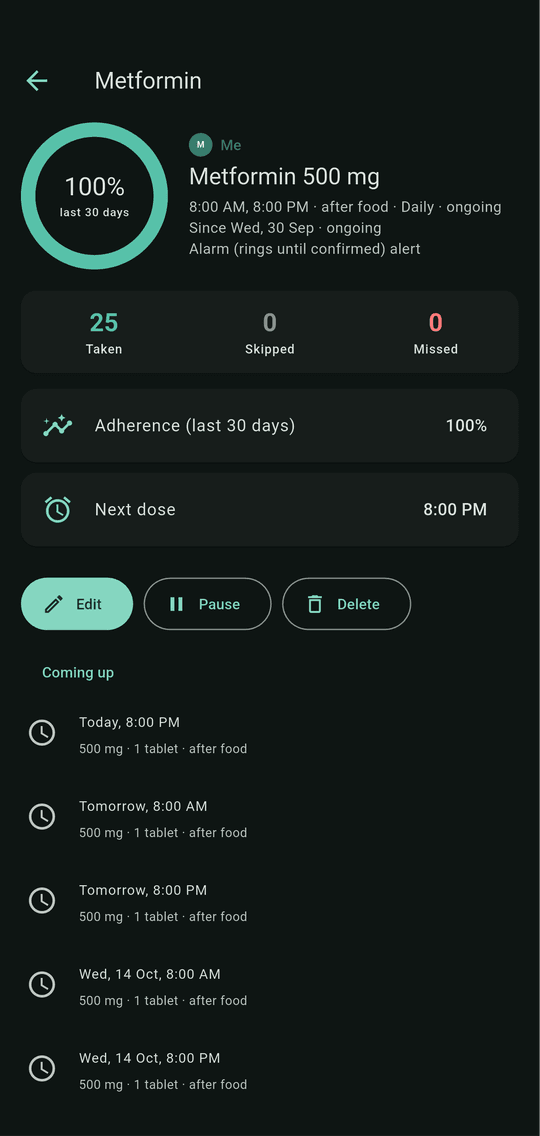
Medicine details
Tap any medicine card to see this page.
- The ring shows your last 30 days.
- Taken / Skipped / Missed counts, then Adherence and Next dose.
- Edit: change anything about the medicine.
- Pause: stops reminders until you press it again (for example while you are travelling).
- Delete: removes the medicine and its reminders.
- Coming up lists the next doses.
6. Visits: doctors, tests and physiotherapy
Plan appointments in the Visits tab and get a reminder before each one.
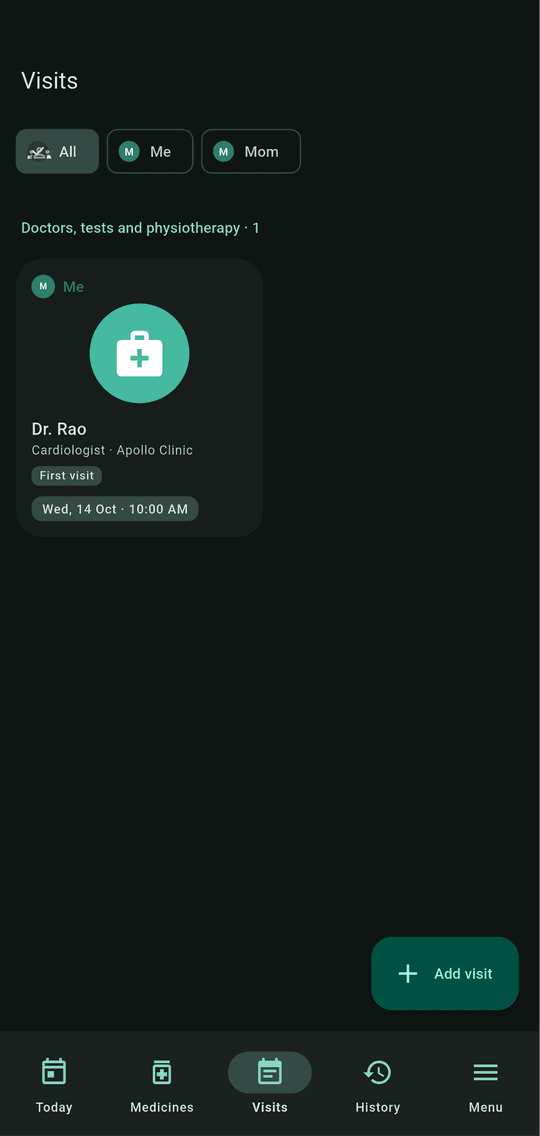
The Visits tab
Each visit is a tile. The green Add visit button is at the bottom right.
- Tile: doctor name, speciality, place, first visit or follow-up, and the date.
- Filters at the top show one person at a time.
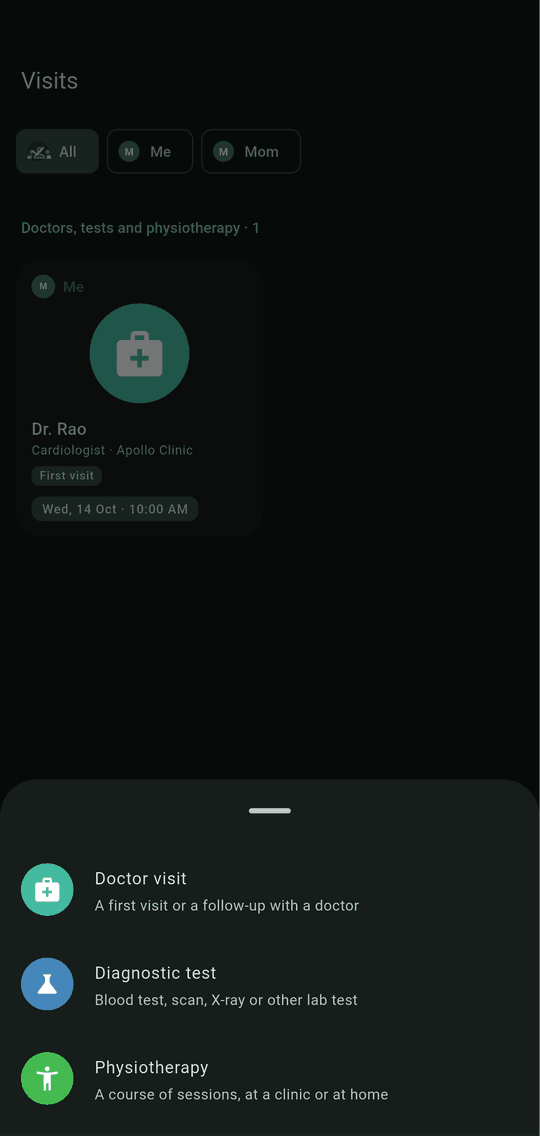
Add a visit
Tap Add visit and choose:
- Doctor visit: a first visit or a follow-up.
- Diagnostic test: a blood test, scan, X-ray or other lab test.
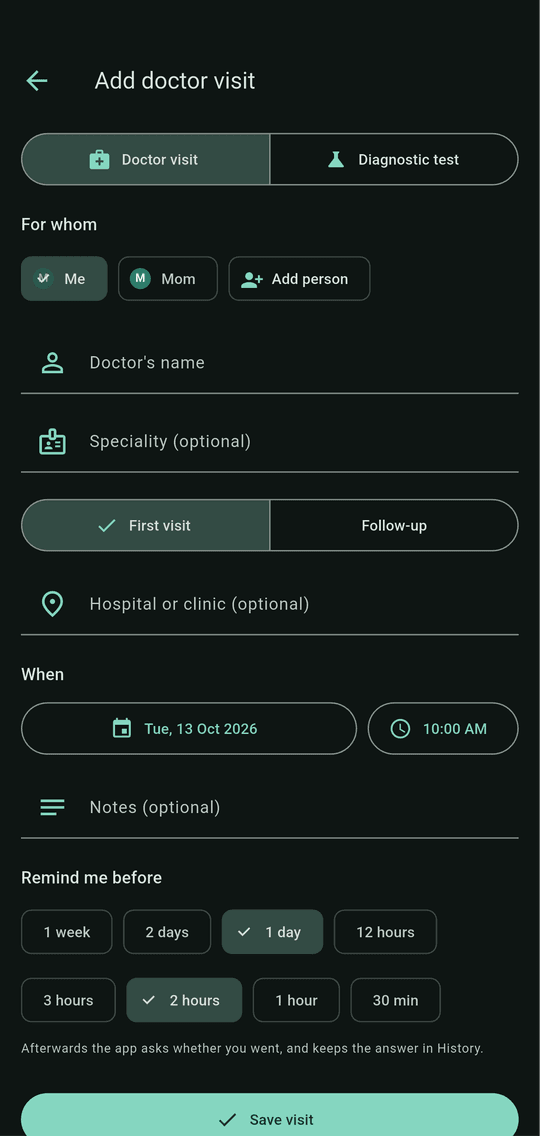
Fill in the visit
- For whom: Me or a family member.
- Doctor's name (needed), Speciality, Hospital or clinic.
- First visit / Follow-up: pick which one.
- When: the date and the time.
- Notes: anything to remember (questions to ask, papers to take).
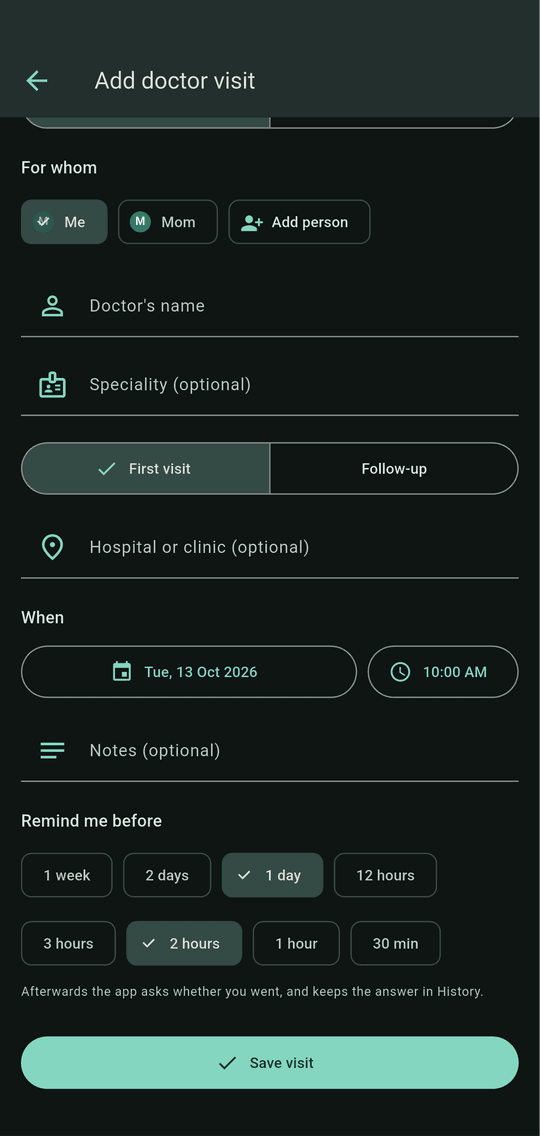
Choose reminders
Pick one or more reminders: 1 week, 2 days, 1 day, 12 hours, 3 hours, 2 hours, 1 hour or 30 minutes before.
- Save visit keeps it and sets the reminders.
- Afterwards the app asks Did you go? and keeps your answer in History.
Tip: For a test where the lab asked you to fast, add an early reminder as your signal to stop eating.
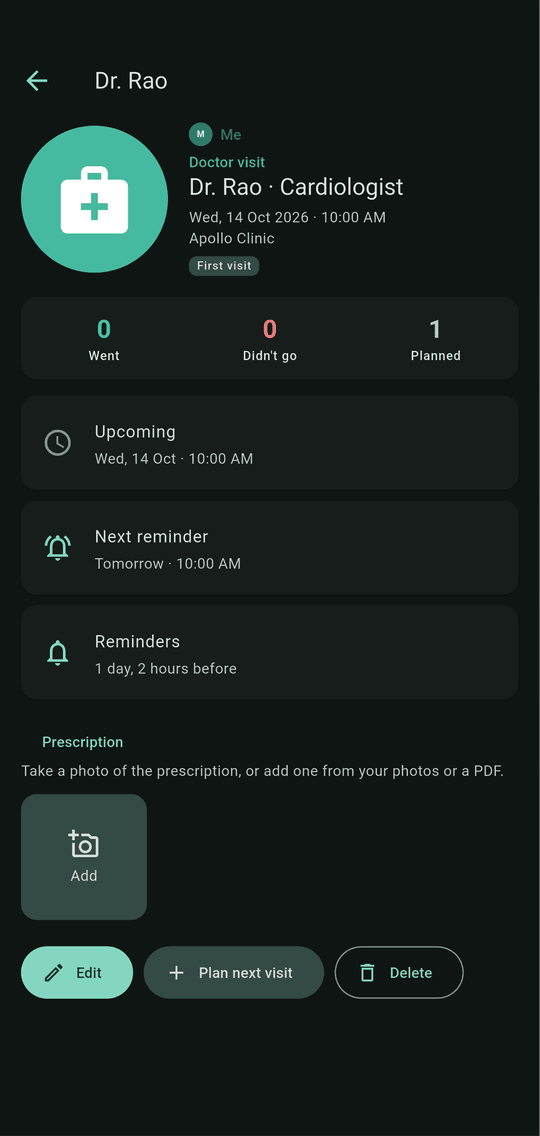
Visit details
Tap a visit tile to open it.
- Counts: how many visits you went to, missed or have planned with this doctor.
- Upcoming, Next reminder, Reminders: when it is and when you will be reminded.
- Prescription: add a photo or PDF of the prescription or the reports afterwards. The files stay on your phone.
- Edit, Plan next visit, Delete at the bottom.
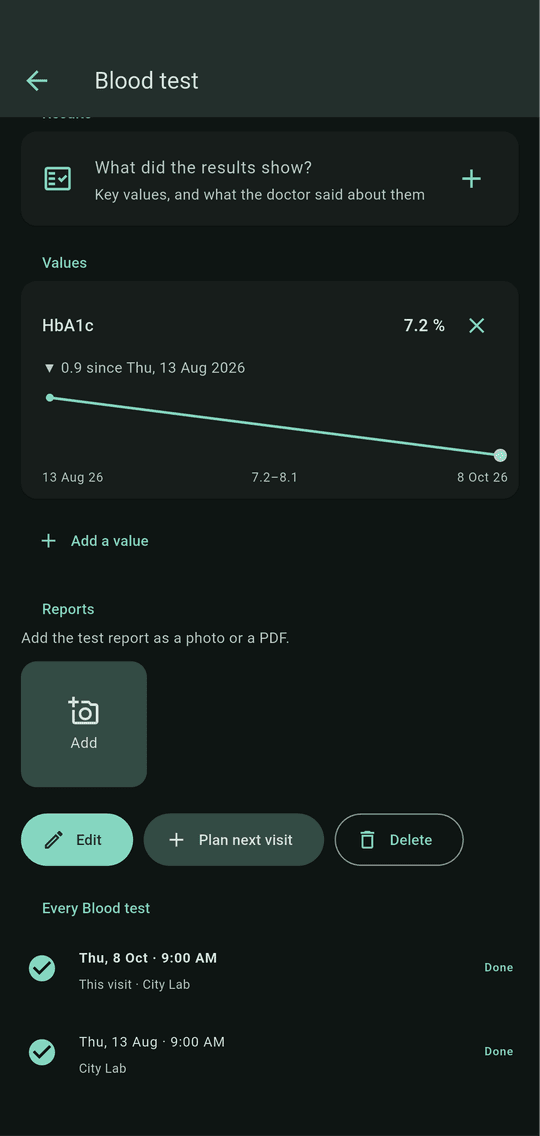
Follow test values over time Pro
On a visit, Values is for numbers from the visit, such as HbA1c or blood pressure. Writing them down is free. Pro shows how they change.
- Add a value: type the name (for example HbA1c), the number and the unit. Use the same name each time so the visits link up.
- The change line says how much it moved since the visit before, for example ▼ 0.9 since Sat, 8 Aug 2026.
- The trend line draws every visit with that value, so you can see if you are getting better.
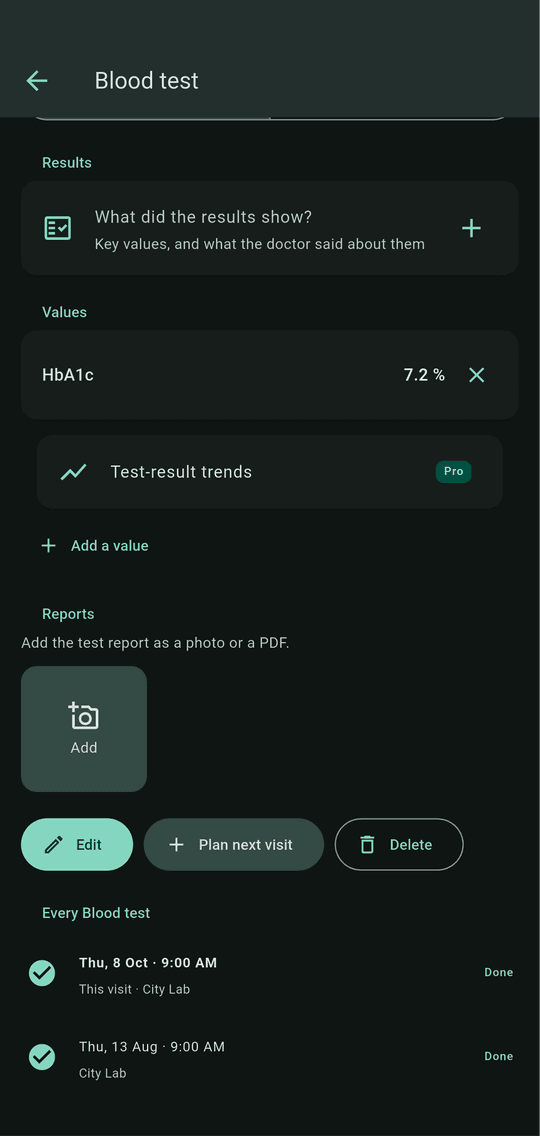
What Free sees: the values you write down, and a Test-result trends row with a Pro label instead of the line.
Physiotherapy
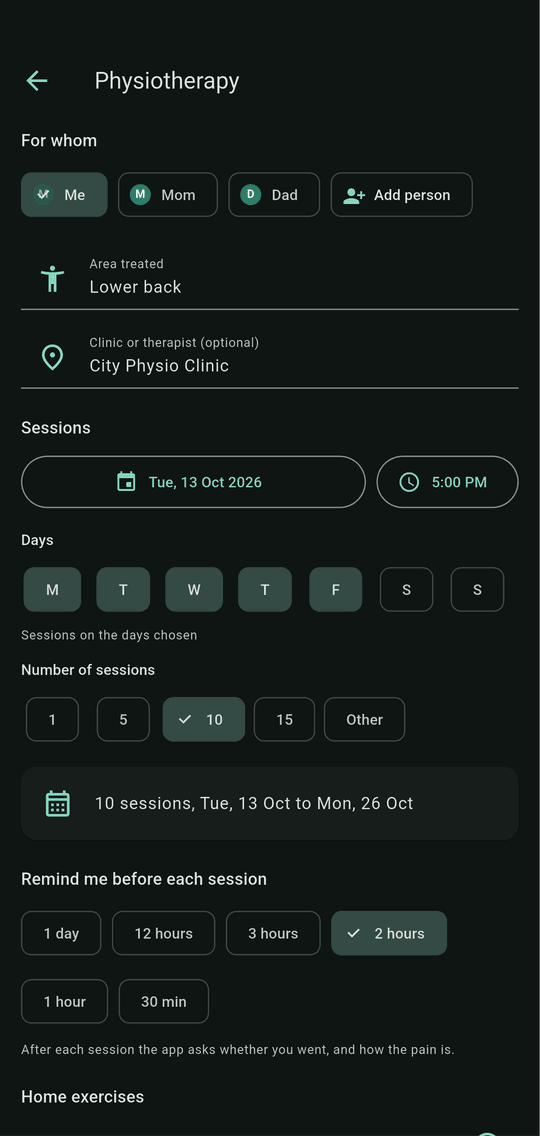
Tap Add visit, then Physiotherapy.
- Area treated (for example Knee or Lower back) and the clinic or therapist.
- First session: the date and time. Days: the days of the week the sessions are on, Monday to Friday to start with.
- Number of sessions: 1, 5, 10, 15 or another number up to 30. The line below shows the plan, for example 10 sessions, Mon, 12 Oct to Fri, 23 Oct.
- Reminders before each session, and the home exercises the therapist gave you.
Tip: One session at a time is free. Planning a whole course in one go is part of Pro.
Your course
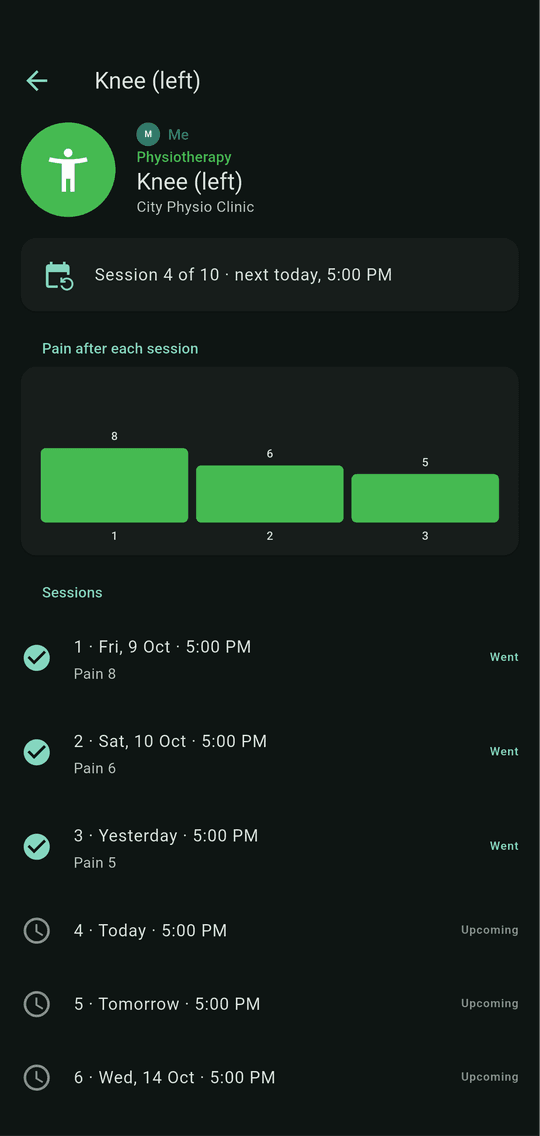
The course is one tile on the Visits tab. Tap it to see where you are.
- Session 4 of 10 · next … at the top.
- After each session the app asks Did you go? Tap Went to note the pain from 0 (none) to 10 (worst), and any notes. With Pro the bars show how the pain changes.
- Sessions: tap one still to come to move it, or one you went to, to change its pain or notes.
- Change the rest moves the time or days of the sessions still to come. End course removes them and keeps the ones you went to in History.
7. History
Open the History tab to look back: Doses, Visits, Alerts and Workouts.
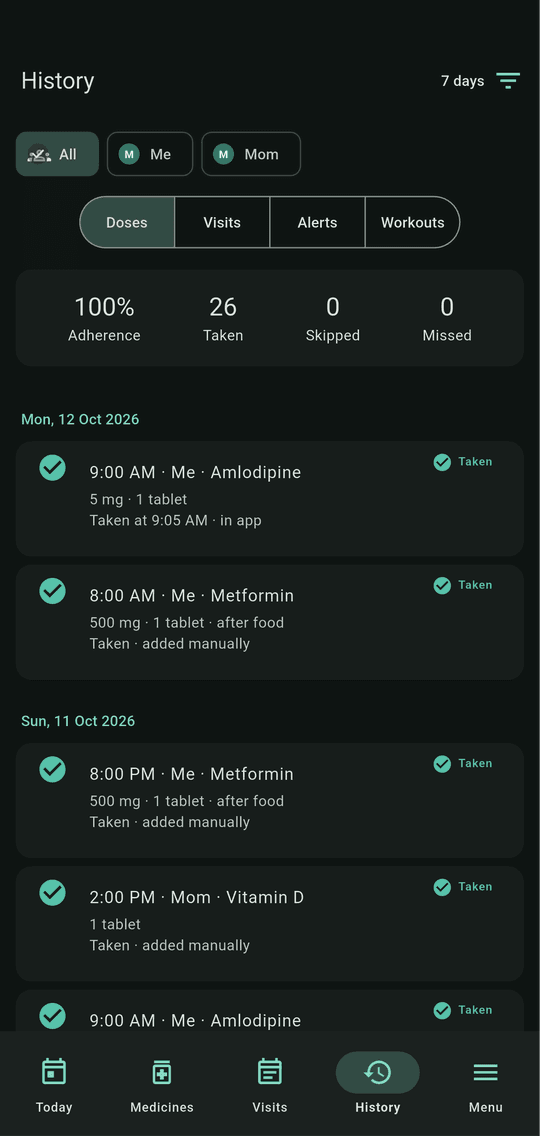
Doses
Your doses day by day.
- Doses / Visits / Alerts / Workouts switch what you see. The names above them (All, Me, Mom…) show one person at a time.
- Adherence, Taken, Skipped, Missed sum up the period.
- The period beside the filter icon (for example 7 days) says how many days are on screen. Tap it to change.
- The list shows each dose with its time, medicine, person and how it was answered.
Tip: Show this to your doctor to talk about how the treatment is going.
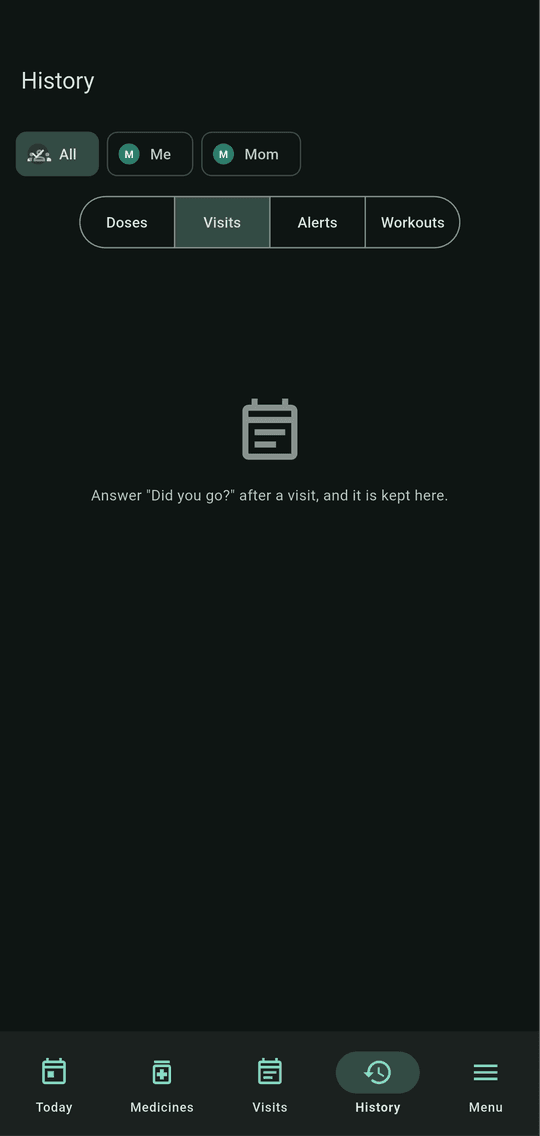
Visits
Visits you answered appear here with Went or Didn't go, newest first. The chips at the top show All visits, or only Doctor, Tests or Physio. A physiotherapy session says which one it was and the pain noted, for example Session 2 of 10 · pain 6.
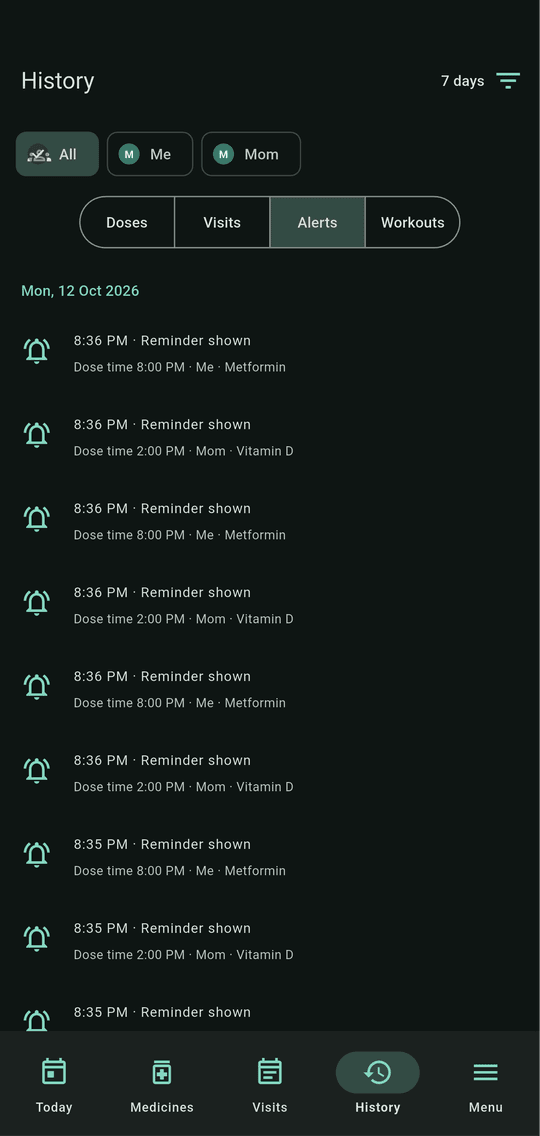
Alerts
A log of every reminder the phone showed, with the time and the medicine. Use it to check that reminders are really ringing. Pick a name above to see only that person's alerts.
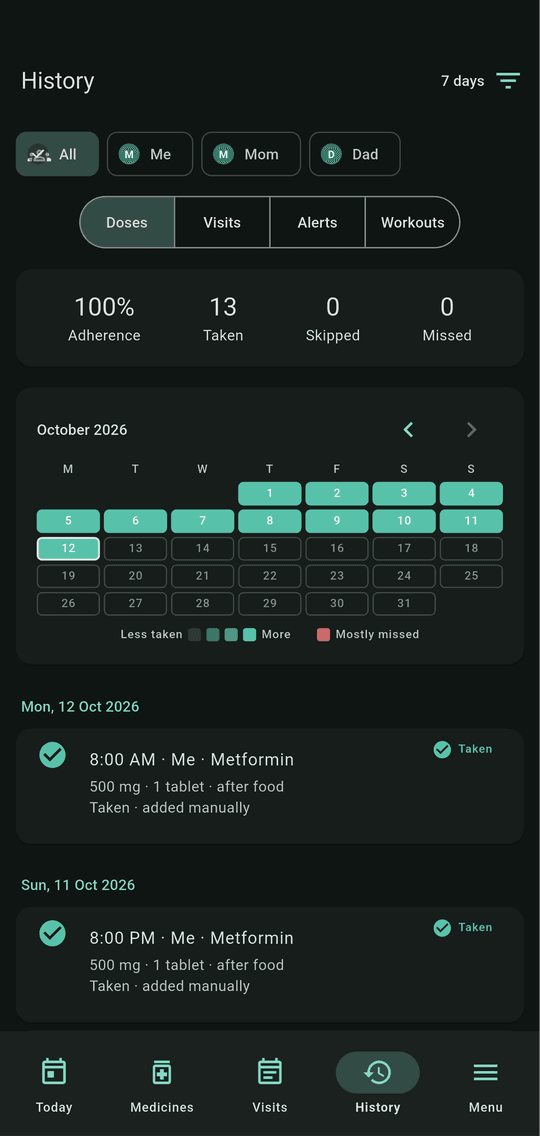
Full history and the calendar Pro
Under the totals, Pro adds a calendar for each month and keeps your history for as long as you have records.
- The calendar: every day is shaded by how much you took. Darker green means more doses taken, red means mostly missed.
- Arrows: move to the month before or after. Tap a day to see its doses.
- The period filter at the top right can go back past 30 days.
What Free sees: the last 30 days, and a Full history row with a Pro label where the calendar is.
8. Family members
Keep medicines for parents, children or anyone you look after in the same app.
Where to find it
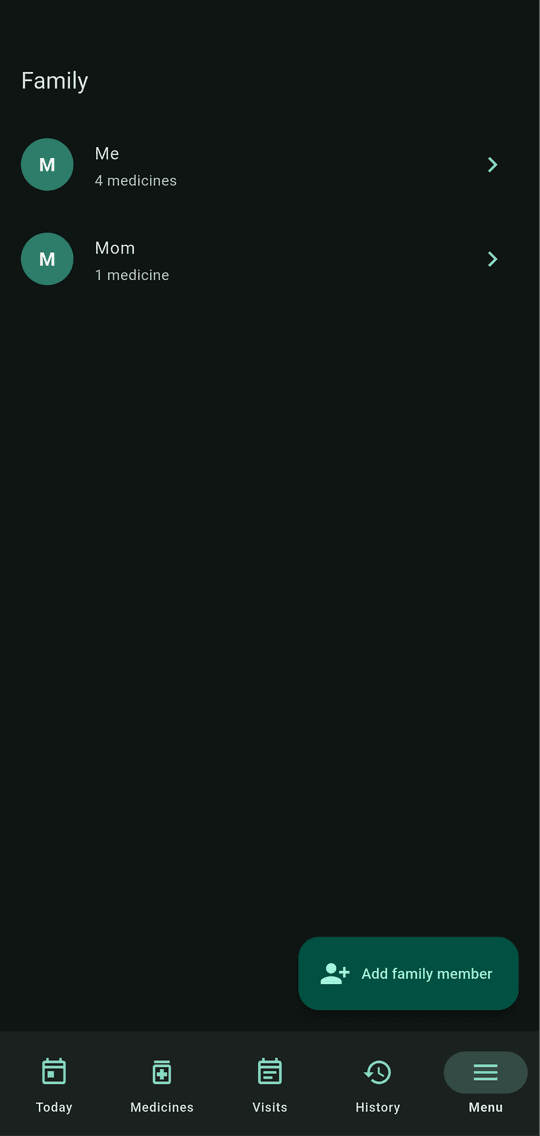
Tap Menu (the last button on the bottom bar), then Family. If you put Family on the bottom bar, tap it there.
- Me, Mom… are the people. Me uses the name of your account. Tap one to change their name or colour, or to remove them.
- Add member adds a new person.
Add a person
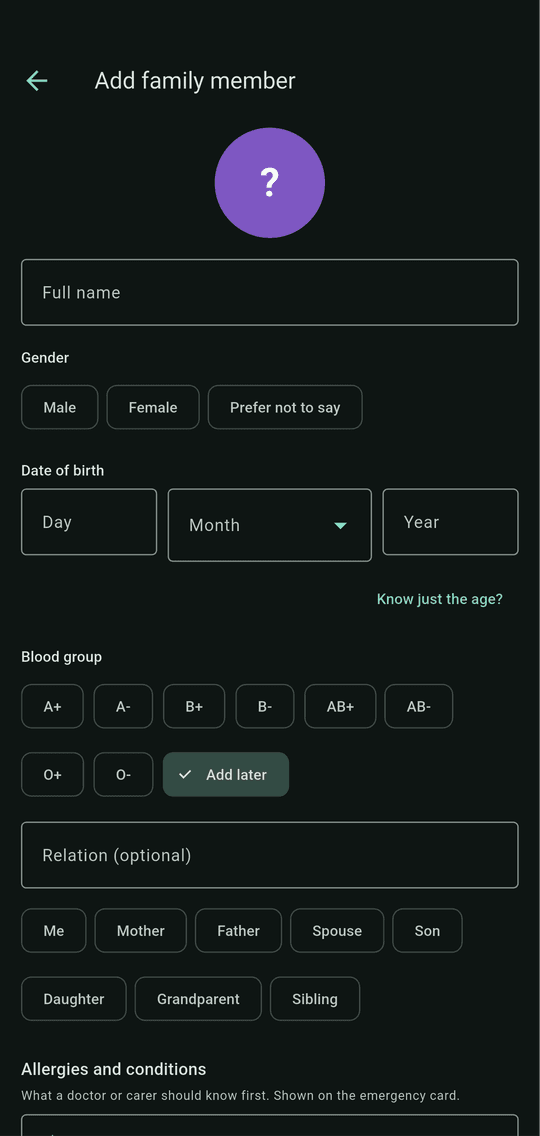
Tap Add member. A full profile takes a minute, and everything but the name and gender can be added later.
- Full name and Gender (Male, Female or Prefer not to say) are needed. Gender lets children's growth charts use the right chart.
- Date of birth: type the day, month and year. If you only know the age, tap Know just the age? and type the years.
- Blood group: tap one, or Add later.
- Relation (Mother, Father, Spouse, Son…), Allergies and conditions, a colour and avatar, and notes.
- Save adds the person. They now appear in For whom when you add a medicine.
Tip: Reminders say whose dose it is, for example Mom: Vitamin D.
More than two people Pro
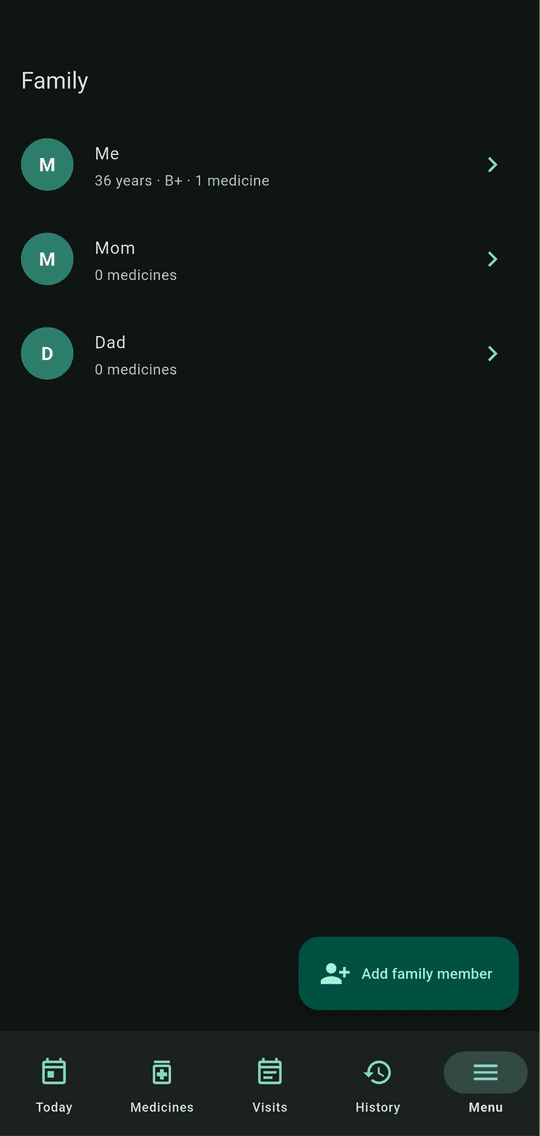
Free covers you and one more person. Pro adds as many as you look after.
- Add member keeps working after the second person: add a third, a fourth and so on.
- Nothing is lost on Free: if you already have more people, they all keep working. Free only stops you adding more.
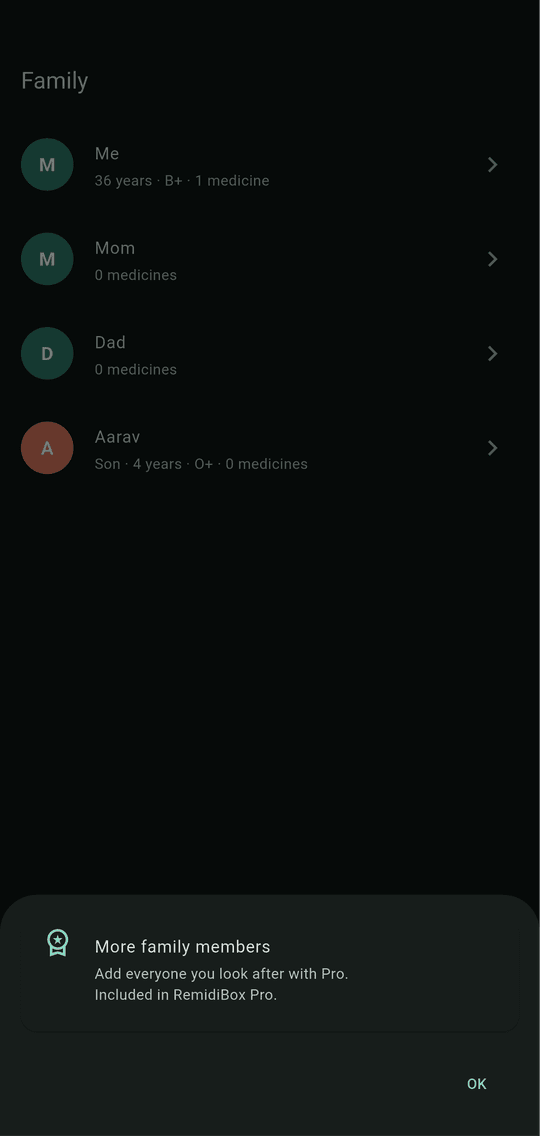
What Free sees: a sheet at the bottom titled More family members, saying Pro adds everyone you look after. Tap OK to close it.
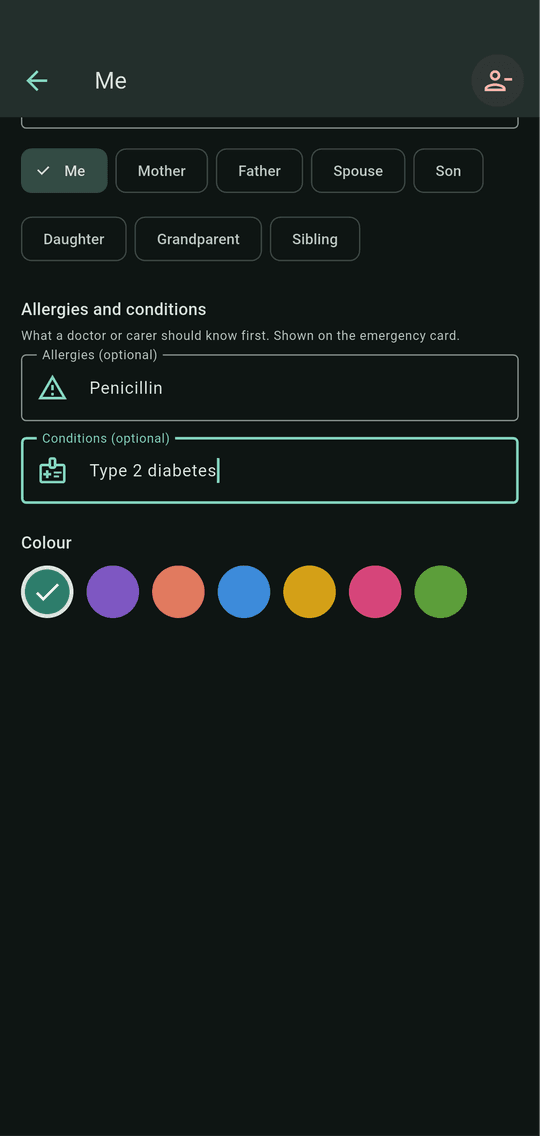
Allergies and conditions
Open a person on the Family page, and scroll to the safety details. They are free for everyone.
- Allergies and Conditions: write what a doctor or carer should know first.
- Save keeps them on the phone. The Emergency card button under the person's numbers opens the card (next step).
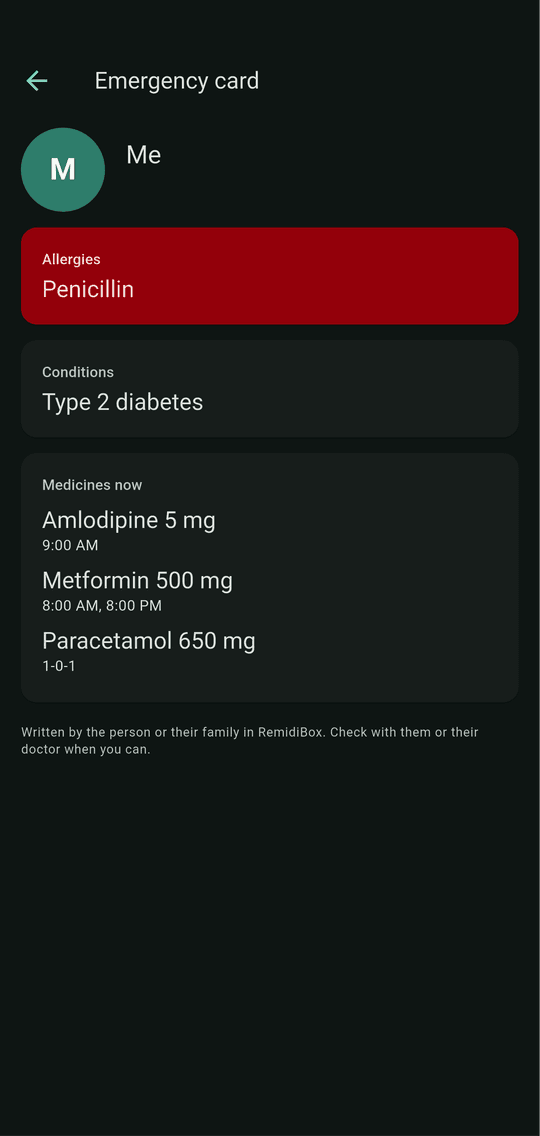
Emergency card
On a person's page, tap Emergency card to see the important things on one screen.
- Name, age and blood group at the top.
- Allergies and Conditions from the page you filled in.
- Medicines now: the person's current medicines with their doses and times, so you can show a doctor or paramedic quickly.
- A line at the bottom reminds whoever reads it that the details were written by the person or their family.
Tip: Keep the details up to date; the card shows only what you saved.
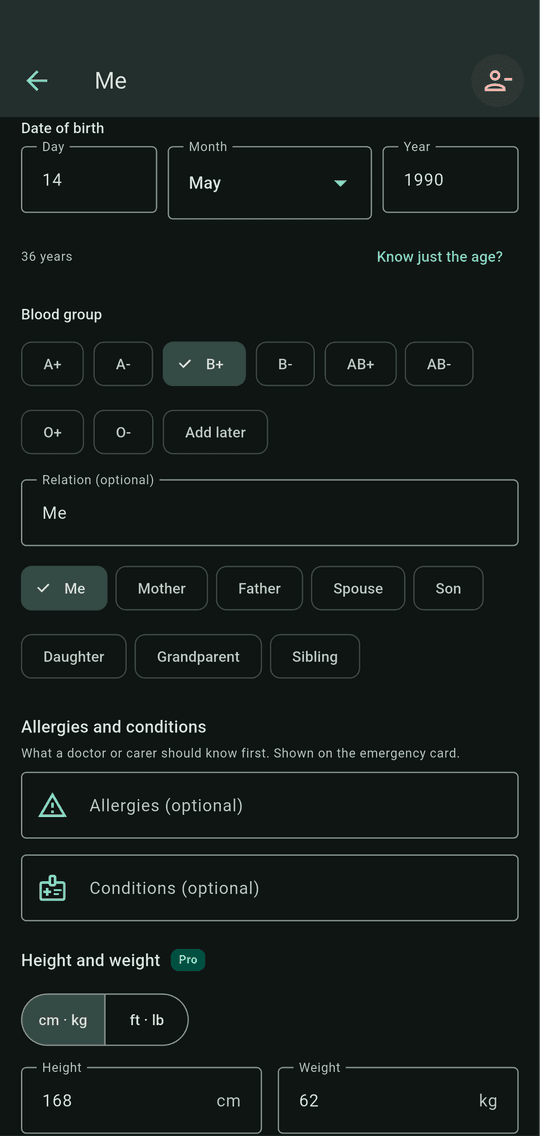
Change a person's details
Open a person on the Family page to change anything you entered, at any time.
- Date of birth shows the age beside it (here 36 years).
- Blood group, relation, allergies and conditions, colour and avatar are all here.
- Height and weight (Pro) is at the bottom: see the next steps.
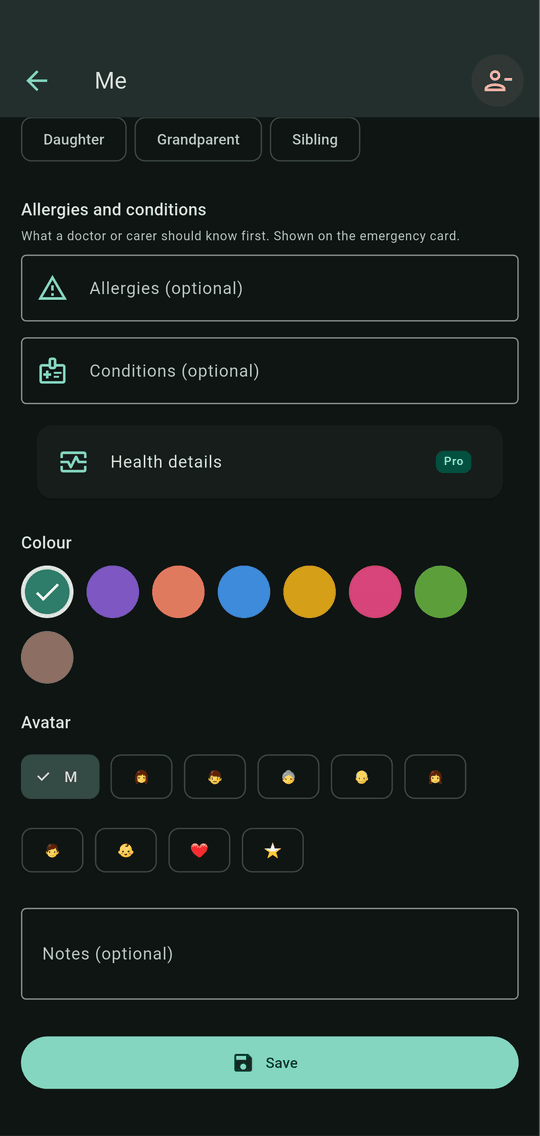
What Free sees: everything above, and a Health details row with a Pro label where height and weight are.
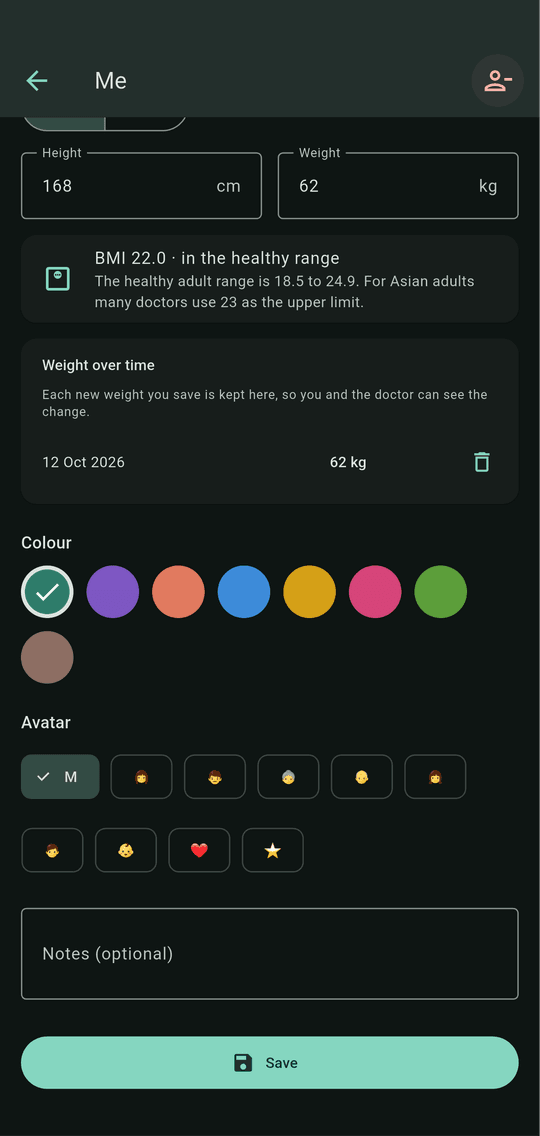
Height, weight and BMI Pro
For adults, Pro adds the measuring section on a person's page.
- cm · kg or ft · lb: choose the units you like. The phone keeps the numbers safely whichever you use.
- Height and Weight: type them and Save. Each saved weight is added to the list for its day.
- BMI is worked out for you, with the adult range (18.5 to 24.9) beside it and a note that many doctors use 23 as the upper limit for Asian adults.
- Weight over time lists every weight with its date. Tap the bin to remove one.
Tip: BMI is a guide, not a diagnosis. Talk to your doctor about what it means for the person.
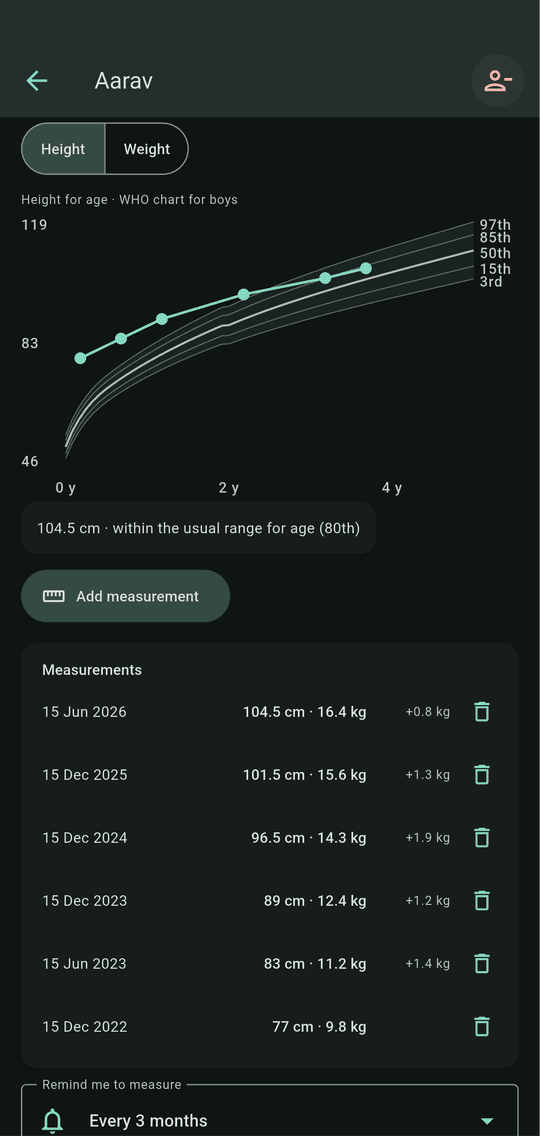
Growth charts for children Pro
For children and teenagers under 18, the page shows WHO growth charts in place of BMI.
- Height / Weight switch the chart. The curved lines show the usual range for the child's age and sex, from the 3rd to the 97th percentile, and the dots are your measurements.
- The line under the chart says where the latest measurement falls, for example 104.5 cm · within the usual range for age (80th).
- Measurements lists each one with its date and the change since the one before (for example +0.8 kg). Tap the bin to remove one.
- Remind me to measure asks how often: every month, every 3, 6 or 12 months, or off.
Tip: Growth charts are a guide to talk over with your doctor.
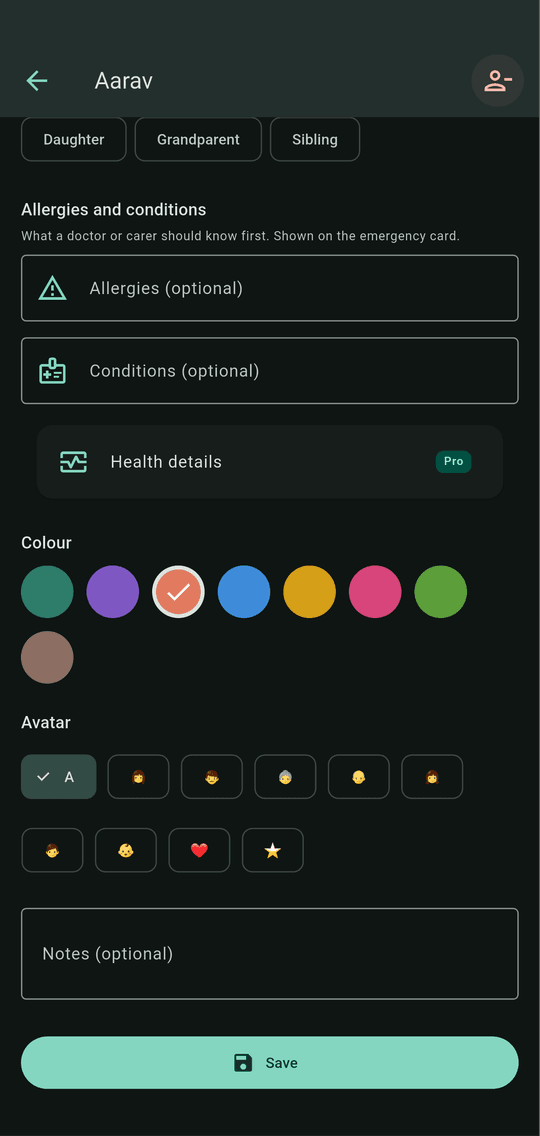
What Free sees: the child's details and a Health details row with a Pro label. Measurements already saved are kept.
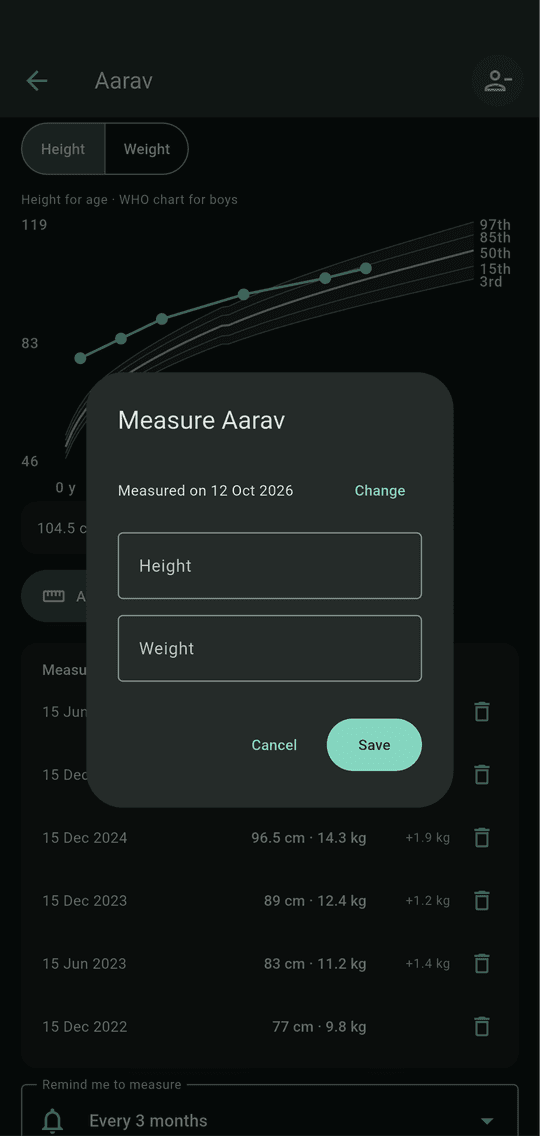
Add a measurement Pro
Tap Add measurement on the growth page.
- The date is today. Tap Change to enter an earlier one, such as a check-up from last month.
- Type the height, the weight, or both, then Save. The chart updates at once.
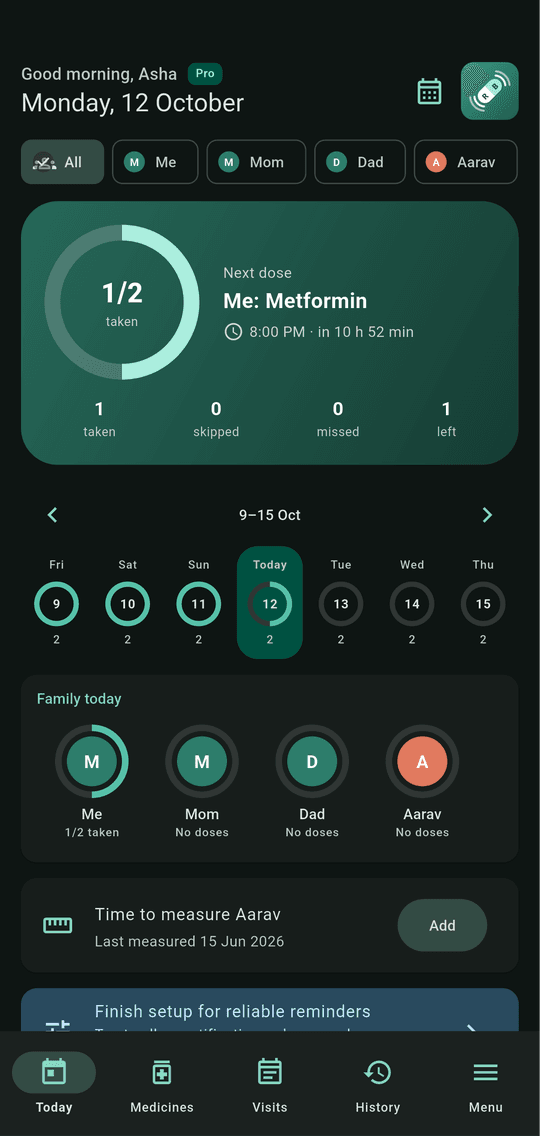
Time to measure Pro
When a measuring reminder is due, Today shows a card for the child.
- The card says Time to measure with the name and the date of the last measurement.
- Tap Add, enter the new height and weight, and the card goes away until the next reminder is due.
- The phone also shows a reminder when it is due.
9. Workouts
Log your exercise, plan workouts that repeat, and see planned against done. Useful with or without medicines.
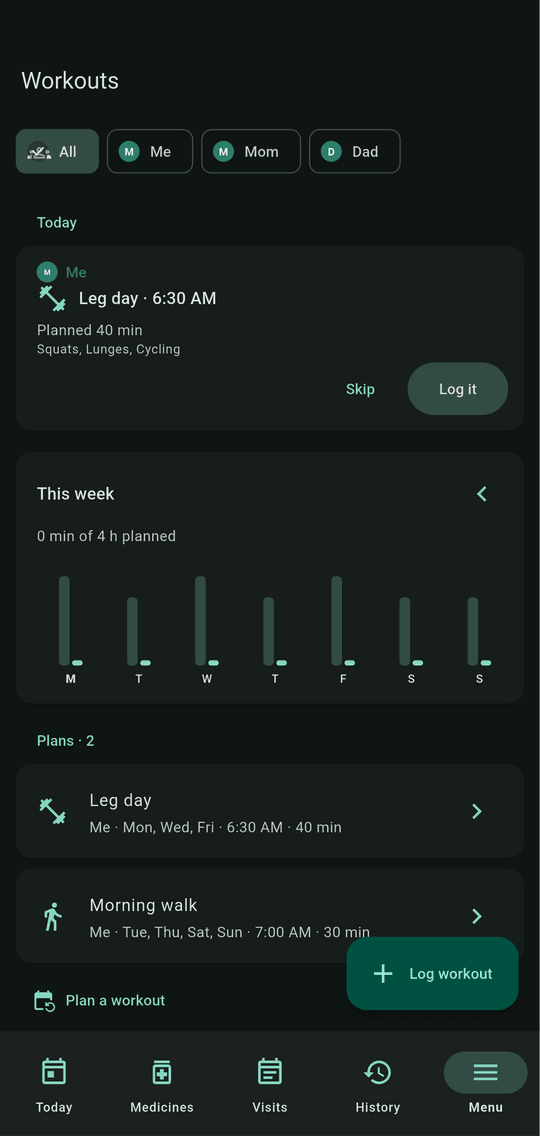
Where to find it
Tap Menu, then Workouts. With Pro you can put it on the bottom bar, or choose the Fitness layout.
- Today: the workouts planned for today. Tap Log it after doing one, or Skip.
- This week: minutes done each day (dark) beside minutes planned (light), and the total. Pro goes back to earlier weeks.
- Plans: your repeating workouts. Tap one to change or pause it.
- Recent: what you did lately. Tap one to change it.
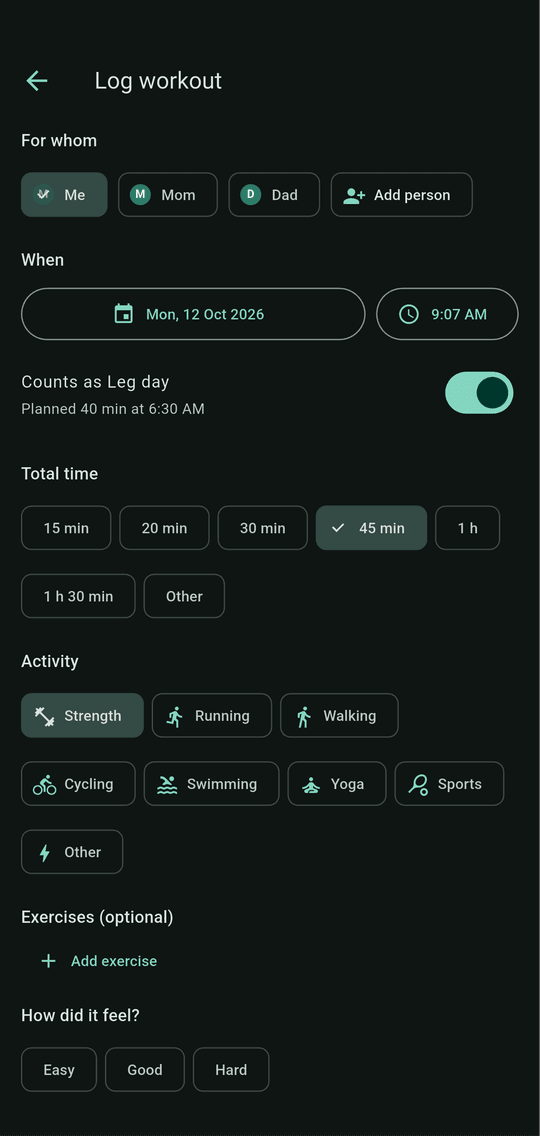
Log a workout
Tap Log workout, or Log it on a plan.
- When and the total time.
- Activity: Strength, Running, Walking, Cycling, Swimming, Yoga, Sports or Other.
- Exercises (optional): each with what suits it: sets and reps, weight, minutes, distance, or laps for swimming. Exercises you typed before are suggested. Pro also picks from a list of more than 60.
- How did it feel? Easy, Good or Hard, and any notes.
Tip: Logging from a plan starts with the planned exercises, so you only change what was different. The workout then shows as, for example, 45 min of 40 min planned.
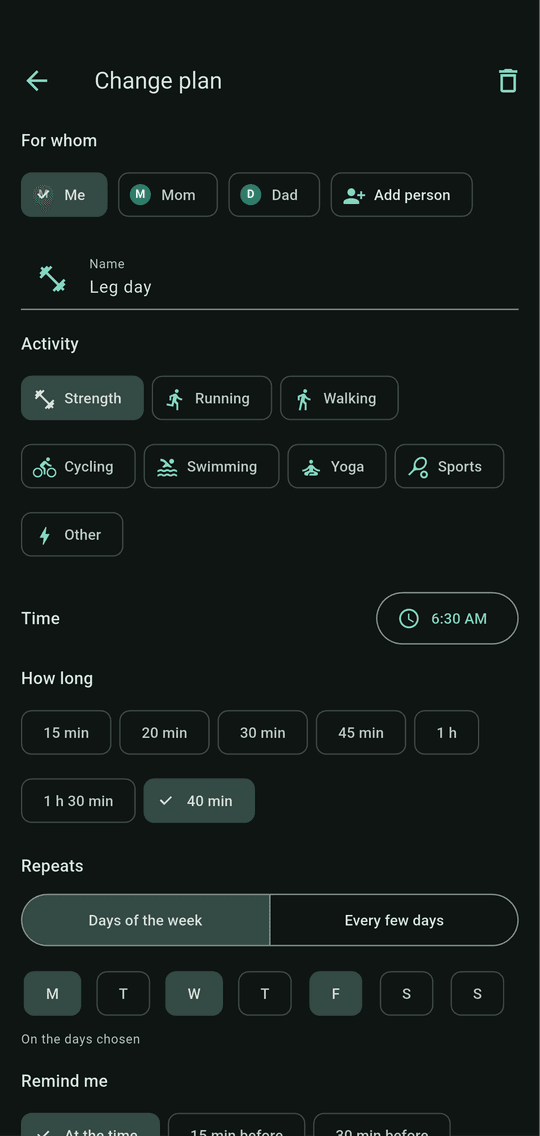
Plan a workout
Tap Plan a workout.
- Name (for example Leg day), activity, time and how long.
- Repeats on the days of the week you choose. Pro also repeats every other day or every few days.
- Remind me at the time, or 15, 30 or 60 minutes before.
- Exercises you plan to do.
Tip: Free has one plan. Pro plans as many as you like, for example leg day, cardio and yoga, each on its own days.
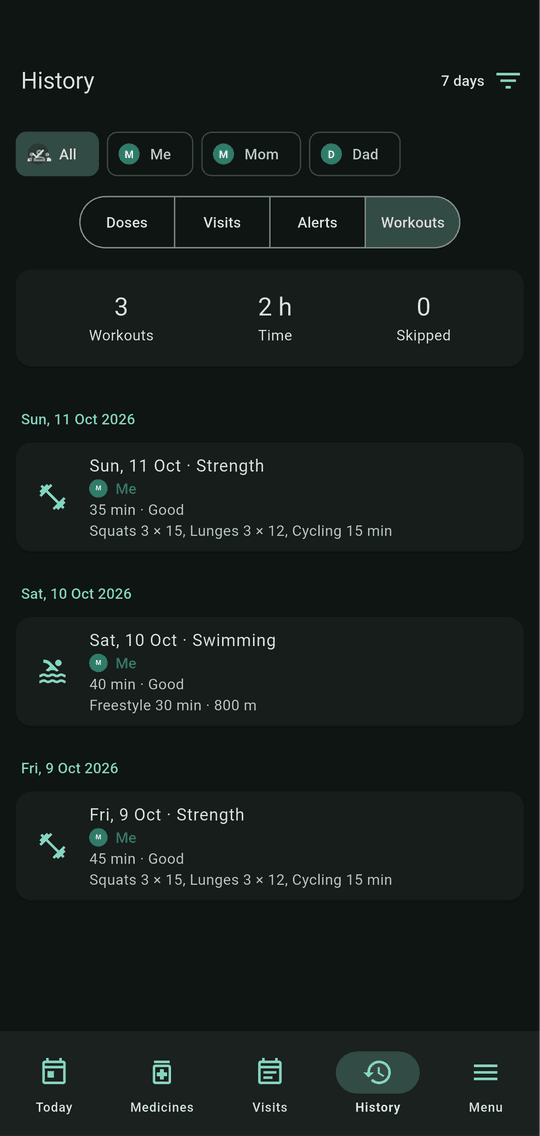
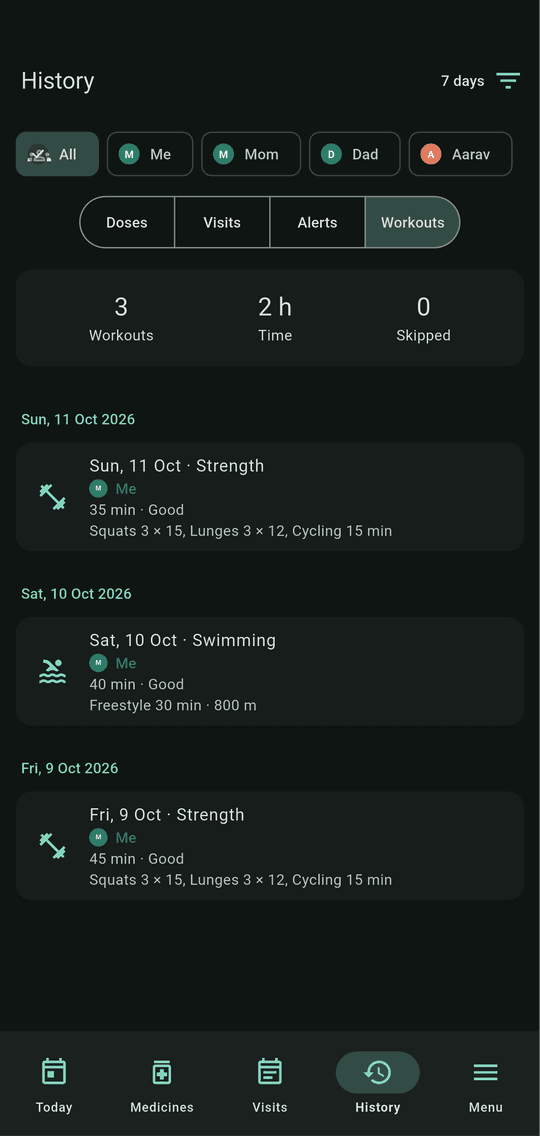
See it in History
Open History → Workouts for the period shown at the top right.
- Workouts, Time and Skipped sum up the period.
- The list shows each workout with its day, activity, time, how it felt and the exercises, newest first. Tap a name above to see one person.
10. Menu and Settings
The Menu button is always the last one on the bottom bar.
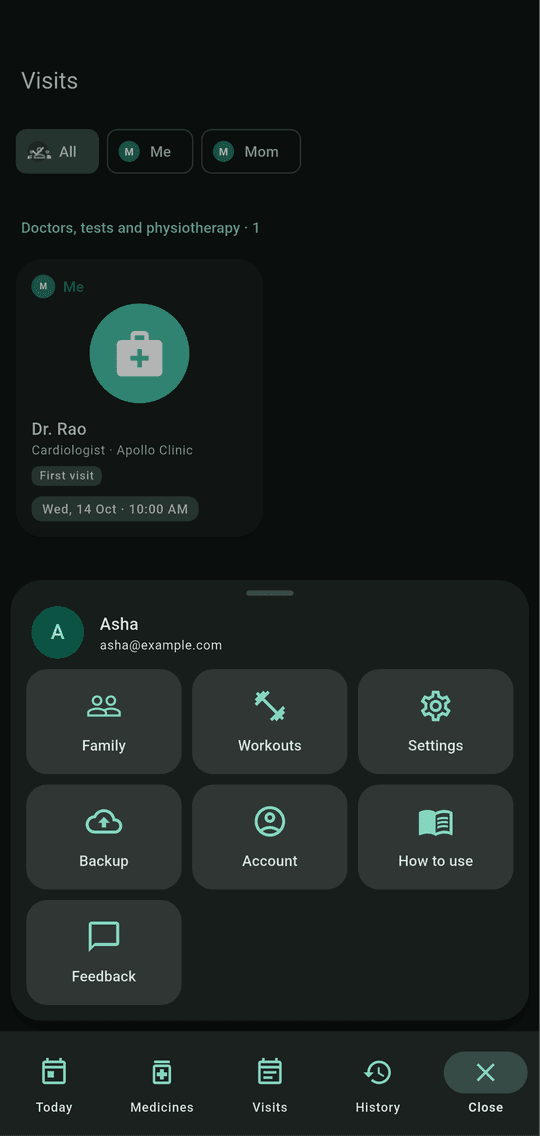
The menu
Tap Menu to open it just above your thumb. Tap Close, the back button or anywhere outside to close it.
- Your name at the top opens your account (see Your account).
- Tiles: the other screens (for example Family and Workouts), then Settings, Backup, Account, How to use (this guide) and Feedback. With Pro you can move your favourites onto the bar: see Your bottom bar.
Tip: Anyone can send feedback, straight to us. Use it to report a problem or suggest something.
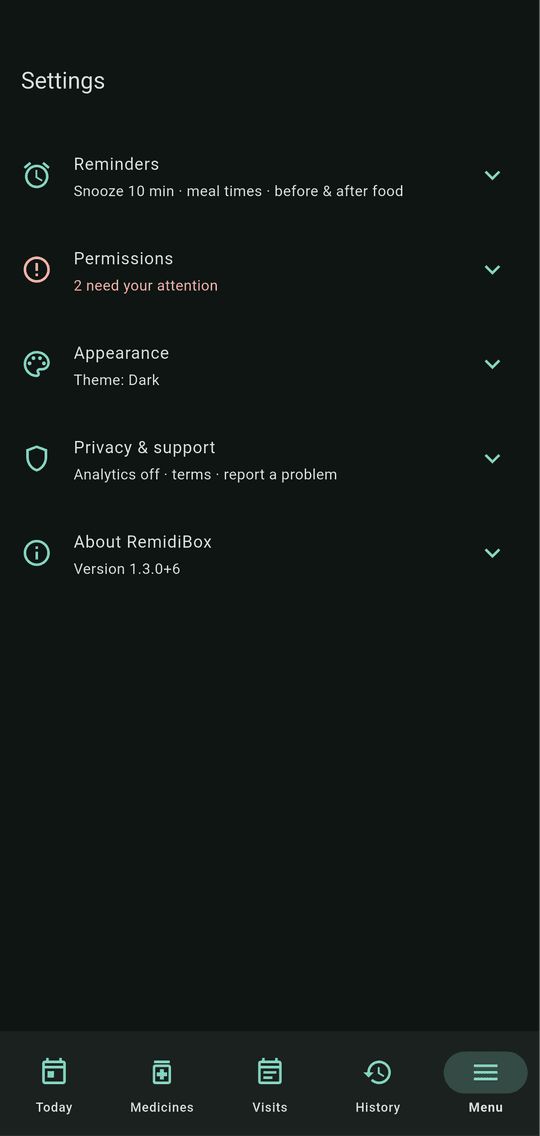
Settings
Open Menu → Settings. Each group opens when you tap it.
- Reminders, Permissions, Appearance, Privacy & support, About. The line under each name sums it up.
- Your account, family, backup, this guide and feedback are in the menu.
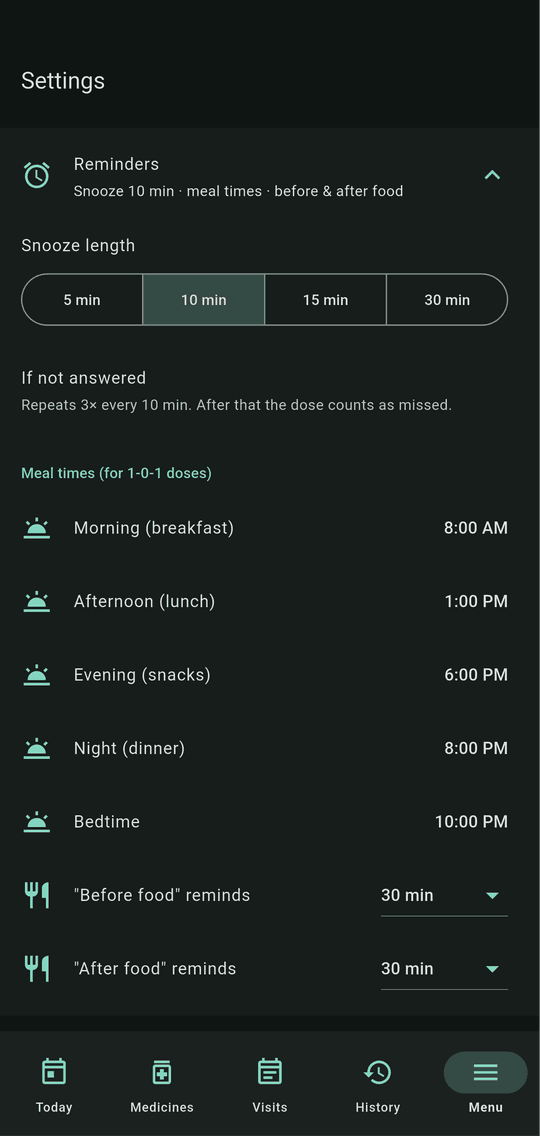
Reminders
How reminders behave.
- Snooze length: 5, 10, 15 or 30 minutes.
- If not answered: the app repeats the reminder 3 times, then counts the dose as missed.
- Meal times: morning, afternoon, evening, night and bedtime. Before food and After food medicines follow these times.
Permissions
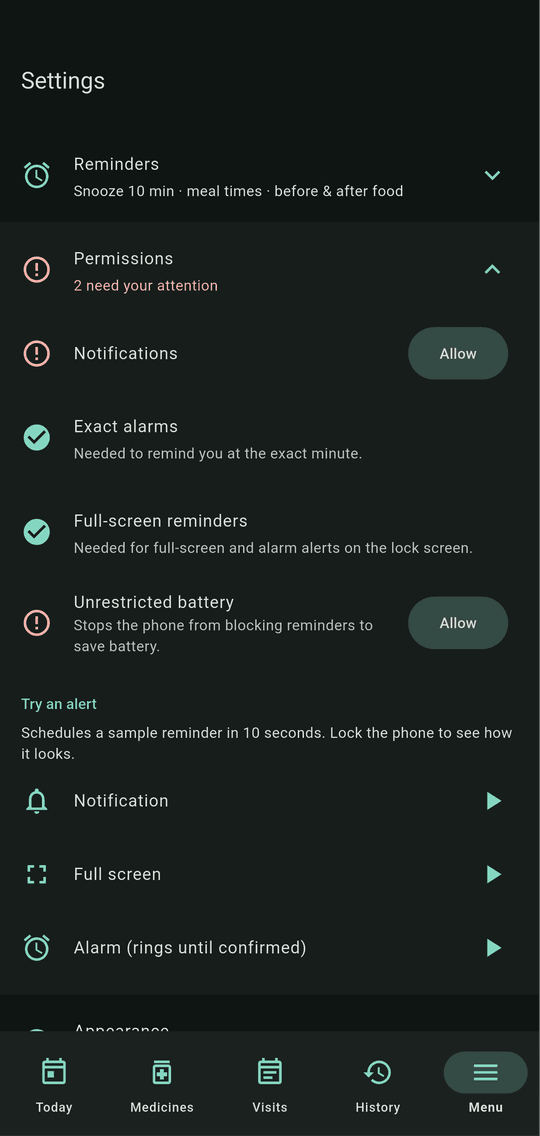
Reminders only ring if Android allows them.
- Notifications, Exact alarms, Full-screen reminders, Unrestricted battery: a green tick means allowed. Tap Allow next to a red one.
- Try an alert: sends you a sample reminder in 10 seconds. Lock the phone to see how it looks.
Backup & restore
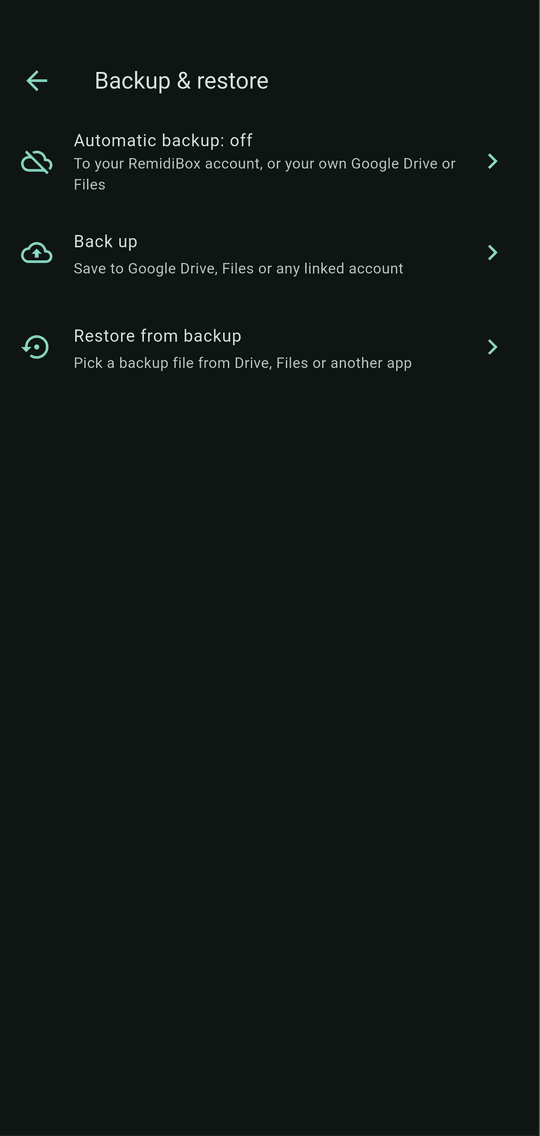
Open Menu → Backup to keep a copy of your medicines, for example before changing phones.
- Back up: saves a file to Google Drive, Files or another app. You can protect it with a password.
- Restore from backup: pick that file on the new phone.
Tip: Signing out clears the phone, so make a backup first to keep your medicines.
Automatic backup
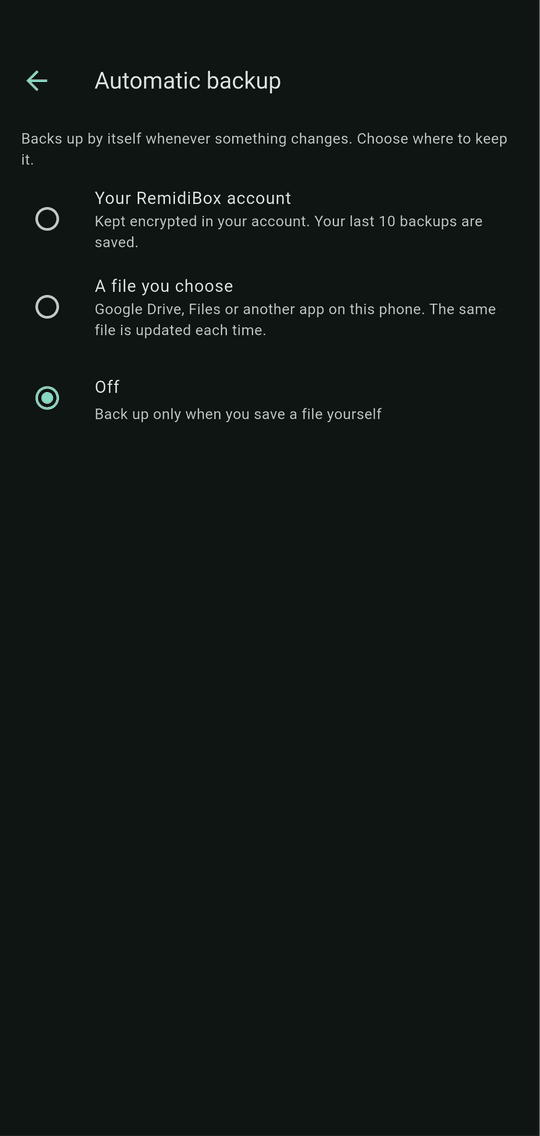
Open Menu → Backup → Automatic backup and let backups look after themselves. It backs up by itself whenever something changes.
- A file you choose: a file in Google Drive, Files or another app. The same file is updated each time, and you can restore it on a new phone.
- Off: back up only when you save a file yourself.
Appearance
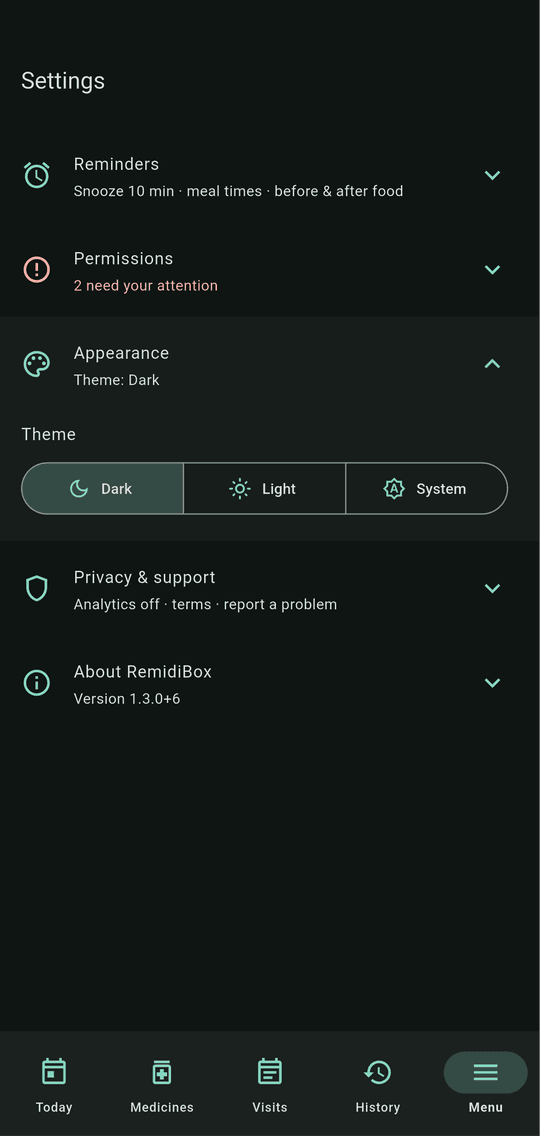
Choose Dark, Light or System (the same as your phone).
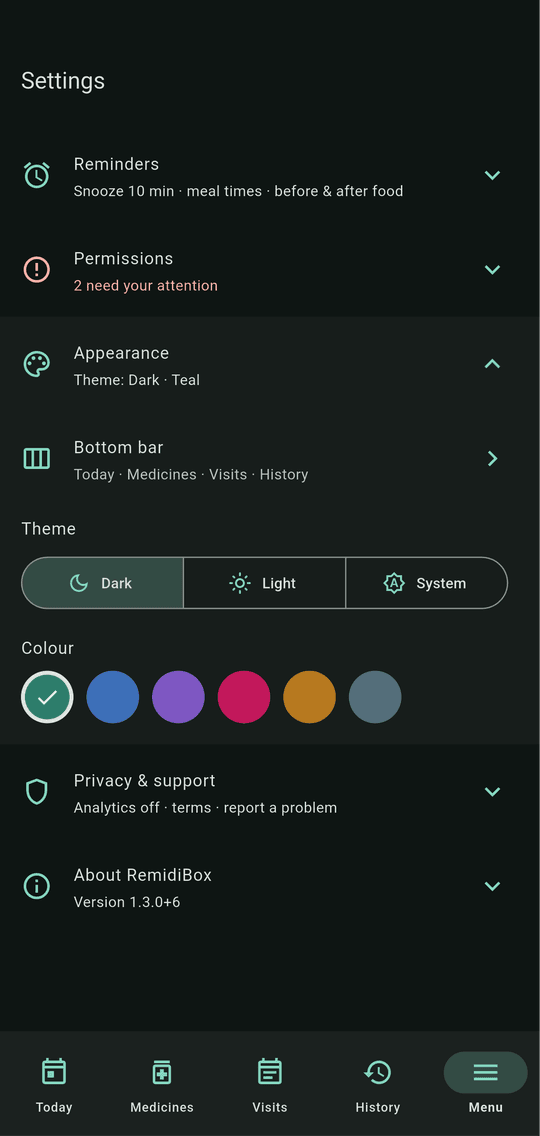
More colours Pro
Under the theme, Pro adds a Colour row. Tap one and the whole app changes to it.
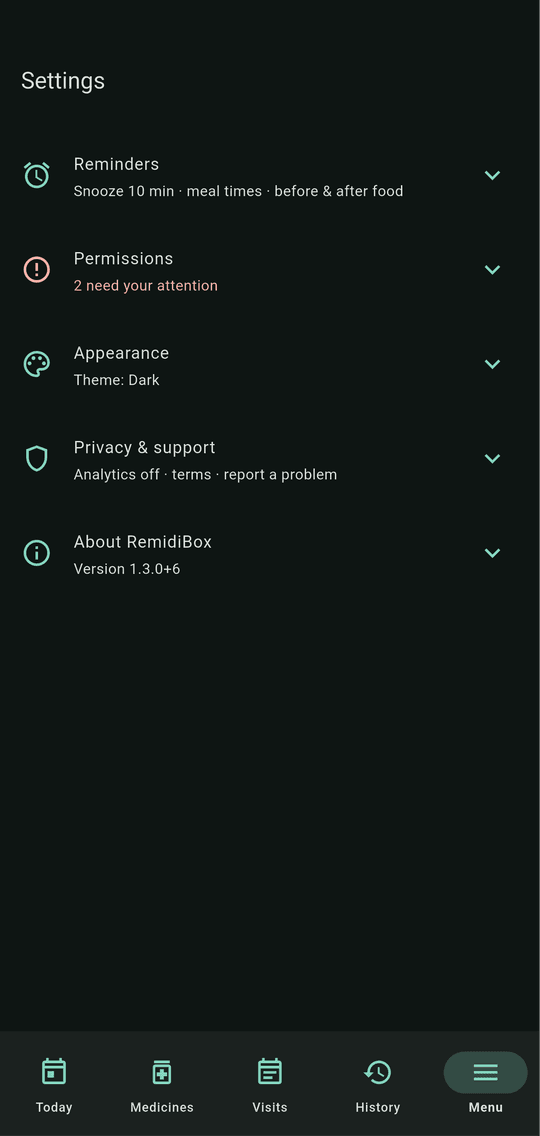
What Free sees: the standard teal theme, and a More themes row with a Pro label.
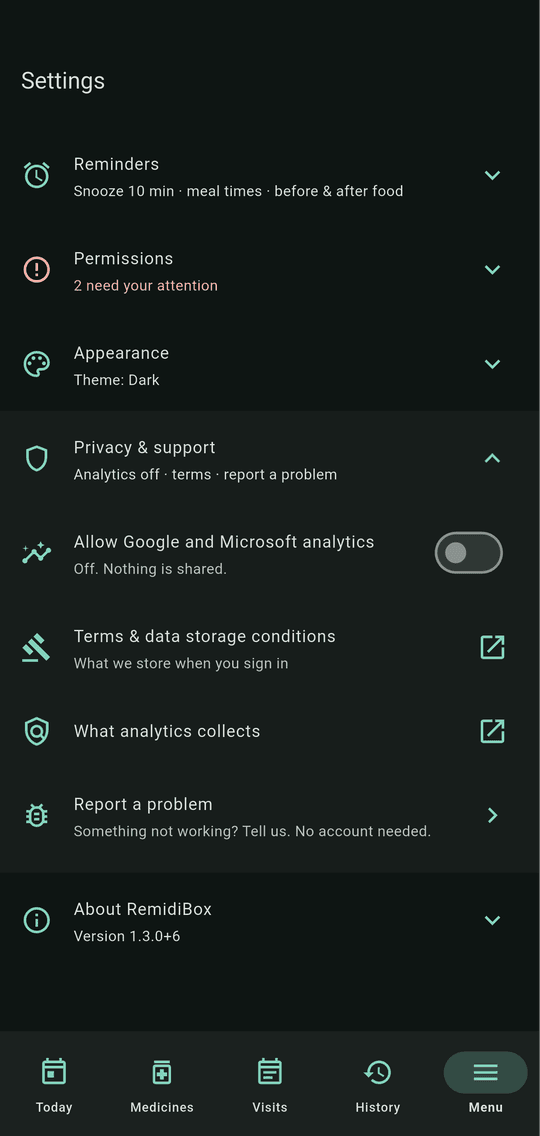
Privacy & support
- Help improve RemidiBox: usage statistics and crash reports; turn them on or off here.
- Terms & privacy: the full text.
- Report a problem: anyone can send it, straight to us. Feedback is in the menu.
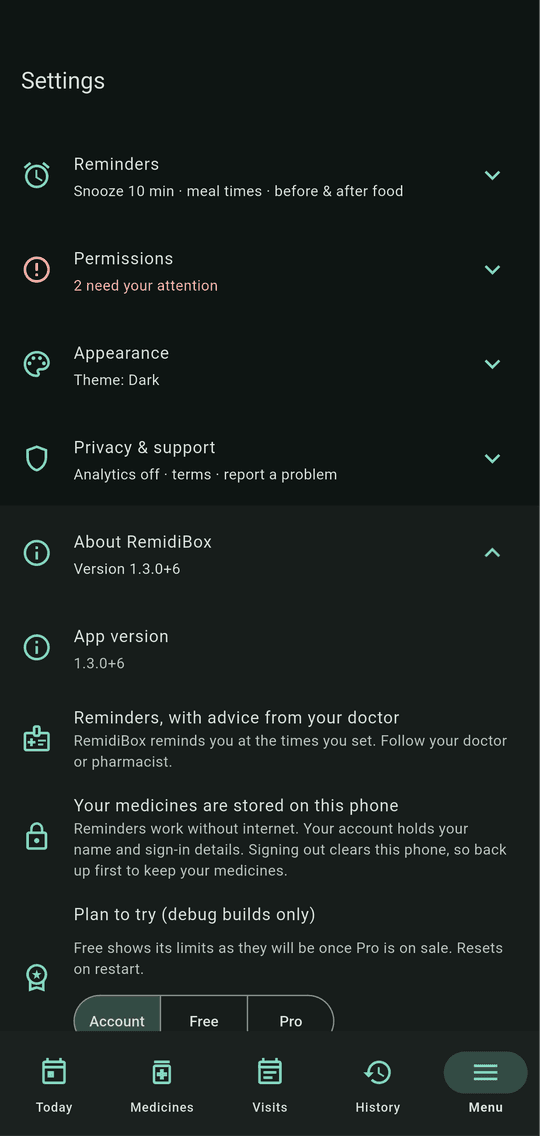
About RemidiBox
The version (for example 1.3.0+6), which is useful when you contact us, and a reminder that advice about medicines comes from your doctor or pharmacist.
11. Your account
Tap Menu, then your name at the top or Account.
- Your details: your name and email. You can add or verify an email address (we send a code to confirm it) and save a mobile number as contact details. You sign in with your email; the mobile number is for contact.
- Change password signs your other phones out.
- Two-step verification: adds a code from an authenticator app after your password. The app shows a key to add to your authenticator, asks for the first code, then shows recovery codes. Keep them somewhere safe: each works once if you lose the authenticator.
- Phones signed in: a list of the phones using this account. Sign out a phone you've stopped using. If you remove RemidiBox and install it again on the same phone, signing in replaces that phone's earlier sign-in, so each phone is listed once.
- Sign out and Sign out of all devices clear the medicines from the phone, so a shared phone stays private. Make a backup first if you want to bring them back.
- Delete account asks for your password (and a code if two-step is on), removes your account details from our servers and clears the phone.
Pro: RemidiBox Pro works on up to 5 phones at a time. To add another, sign one out here.
12. Make sure every reminder rings
Most of the time it is an Android setting. Go through this list.
- Open Menu → Settings → Permissions and tap Allow on every red row (Notifications, Exact alarms, Full-screen reminders, Unrestricted battery).
- Tap Try an alert and lock the phone. You should get a sample reminder in 10 seconds.
- Make sure the phone is not in Do not disturb, and that the medicine's alert type is Full screen or Alarm if you want it loud.
- On some phones (Samsung, Xiaomi, Oppo, Vivo) also set the app's battery use to Unrestricted in Android's own App settings.
- Still stuck? Open History → Alerts to see whether the reminder was shown, then tell us what happened and your phone model.